6.3 Antilock Brake Systems

Testing ABS systems, at the back and side of a semitruck trailer the ABS test light appears just behind the rear wheels
Caption
Figure 6.7

6.3.1 Trailers Required to Have ABS

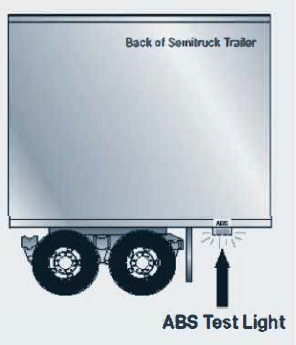
All trailers and converter dollies built on or after March 1, 1998, are required to have ABS. However, many trailers and converter dollies built before this date have been voluntarily equipped with ABS.

Trailers will have yellow ABS malfunction lamps on the left side, either on the front or rear comer. See Figure 6.7. Dollies manufactured on or after March 1, 1998, are required to have a lamp on the left side.

In the case of vehicles manufactured before the required date, it may be difficult to tell if the unit is equipped with ABS. Look under the vehicle for the ECU and wheel speed sensor wires coming from the back of the brakes.

6.3.2 Braking with ABS

ABS is an addition to your normal brakes. It does not decrease or increase your normal braking capability. ABS only activates when wheels are about to lock up.

ABS does not necessarily shorten your stopping distance, but it does help you keep the vehicle under control during hard braking.

ABS helps you avoid wheel lock up. The computer senses impending lockup, reduces the braking pressure to a safe level, and you maintain control.

Having ABS on only the trailer, or even on only one axle, still gives you more control over the vehicle during braking.

When only the trailer has ABS, the trailer is less likely to swing out, but if you lose steering control or start a tractor jackknife, let up on the brakes (if you can safely do so) until you gain control.

When you drive a tractor-trailer combination with ABS, you should brake as you always have. In other words:

  • Use only the braking force necessary to stop safely and stay in control.
  • Brake the same way, regardless of whether you have ABS on the tractor, the trailer, or both.
  • As you slow down, monitor your tractor and trailer and back off the brakes (if it is safe to do so) to stay in control.

Remember, if your ABS malfunctions, you still have regular brakes. Drive normally, but get the system serviced soon.

ABS won't allow you to drive faster, follow more closely, or drive less carefully.

6.4 Coupling and Uncoupling

Knowing how to couple and uncouple correctly is basic to safe operation of combination vehicles. Wrong coupling and uncoupling can be very dangerous. General coupling and un­coupling steps are listed in Sections 6.4.1 and 6.4.2. There are differences between different rigs, so learn the details of coupling and uncoupling the truck(s) you will operate.

6.4.1 Coupling Tractor-Semitrailers

Step 1. Inspect Fifth Wheel
  • Check for damaged and / or missing parts.
  • Check to see that mounting to tractor is secure, no cracks in frame, etc.
  • Be sure that the fifth wheel plate is greased as required. Failure to keep the fifth wheel plate lubricated could cause steering problems because of friction between the tractor and trailer.
  • Check if fifth wheel is in proper position for coupling.
    • Wheel tilted down toward rear of tractor.
    • Jaws open.
    • Safety unlocking handle in the automatic lock position.
    • If you have a sliding fifth wheel, make sure it is locked.
    • Make sure the trailer kingpin is not bent or broken.
Step 2. Inspect Area and Chock Wheels
  • Make sure area around the vehicle is clear.
  • Be sure trailer wheels are chocked or spring brakes are on.
  • Check that cargo (if any) is secured against movement due to tractor being coupled to the trailer.
Step 3. Position Tractor
  • Put the tractor directly in front of the trailer. (Never back under the trailer at an angle because you might push the trailer sideways and break the landing gear.)
  • Check position, using outside mirrors, by looking down both sides of the trailer.
Step 4. Back Slowly
  • Back until fifth wheel just touches the trailer.
  • Don't hit the trailer.
Step 5. Secure Tractor
  • Put on the parking brake.
  • Put transmission in neutral.
Step 6. Check Trailer Height
  • The trailer should be low enough that it is raised slightly by the tractor when the tractor is backed under it. Raise or lower the trailer as needed. (If the trailer is too low, the tractor may strike and damage the trailer nose; if the trailer is too high, it may not couple correctly.)
  • Check that the kingpin and fifth wheel are aligned.
Step 7. Connect Air Lines to Trailer
  • Check glad hand seals and connect tractor emergency air line to trailer emergency glad hand.
  • Check glad hand seals and connect tractor service air line to trailer service glad hand.
  • Make sure air lines are safely supported where they won't be crushed or caught while tractor is backing under the trailer.
Step 8. Supply Air to Trailer
  • From cab, push in "air supply" knob or move tractor protection valve control from the "emergency" to the "normal" position to supply air to the trailer brake system.
  • Wait until the air pressure is normal.
  • Check brake system for crossed air lines.
    • Shut engine off so you can hear the brakes.
    • Apply and release trailer brakes and listen for sound of trailer brakes being applied and released. You should hear the brakes move when applied and air escape when the brakes are released.
    • Check air brake system pressure gauge for signs of major air loss.
  • When you are sure trailer brakes are work­ing, start engine.
  • Make sure air pressure is up to normal.
Step 9. Lock Trailer Brakes
  • Pull out the "air supply" knob or move the tractor protection valve control from "normal" to "emergency."
Step 10. Back Under Trailer
  • Use lowest reverse gear.
  • Back tractor slowly under trailer to avoid hit­ting the kingpin too hard.
  • Stop when the kingpin is locked into the fifth wheel.
Step 11. Check Connection for Security
  • Raise trailer landing gear slightly off ground.
  • Pull tractor gently forward while the trailer brakes are still locked to check that the trailer is locked onto the tractor.
Step 12. Secure Vehicle
  • Put transmission in neutral.
  • Put parking brakes on.
  • Shut off engine and take key with you so someone else won't move truck while you are under it.
Step 13. Inspect Coupling
  • Use a flashlight, if necessary.
  • Make sure there is no space between upper and lower fifth wheel. If there is space, some­thing is wrong (kingpin may be on top of the closed fifth wheel jaws, and trailer would come loose very easily).
  • Go under trailer and look into the back of the fifth wheel. Make sure the fifth wheel jaws have closed around the shank of the kingpin.
  • Check that the locking lever is in the "lock" position.
  • Check that the safety latch is in position over locking lever. (On some fifth wheels the catch must be put in place by hand.)
  • If the coupling isn't right, don't drive the coupled unit; get it fixed.
Step 14. Connect the Electrical Cord and Check Air Lines
  • Plug the electrical cord into the trailer and fasten the safety catch.
  • Check both air lines and electrical line for signs of damage.
  • Make sure air and electrical lines will not hit any moving parts of vehicle.
Step 15. Raise Front Trailer Supports (Landing Gear)
  • Use low gear range (if so equipped) to begin raising the landing gear. Once free of weight, switch to the high gear range.
  • Raise the landing gear all the way up. (Never drive with landing gear only part way up as it may catch on railroad tracks or other things.)
  • After raising landing gear, secure the crank handle safely.
  • When full weight of trailer is resting on tractor:
    • Check for enough clearance between rear of tractor frame and landing gear. (When tractor turns sharply, it must not hit land­ing gear.)
    • Check that there is enough clearance between the top of the tractor tires and the nose of the trailer.
Step 16. Remove Trailer Wheel Chocks
  • Remove and store wheel chocks in a safe place.