2.1.4 CDL Pre-trip Inspection Test

In order to obtain a CDL you will be required to pass a pre-trip inspection test. You will be tested to see if you know whether your vehicle is safe to drive. You will be asked to do a pre­trip inspection of your vehicle and explain to the examiner what you would inspect and why. The following seven-step inspection method should be useful.

2.1.5 Seven-step Inspection Method

Method of Inspection. You should do a pre-­trip inspection the same way each time so you will learn all the steps and be less likely to forget something.

Approaching the Vehicle. Notice general condition. Look for damage or vehicle leaning to one side. Look under the vehicle for fresh oil, coolant, grease, or fuel leaks. Check the area around the vehicle for hazards to vehicle movement (people, other vehicles, objects, low-­hanging wires, limbs, etc.).

Vehicle Inspection Guide

Step 1: Vehicle Overview

Review Last Vehicle Inspection Report. Drivers may have to make a vehicle inspection report in writing each day. The motor carrier must repair any items in the report that affect safety and certify on the report that repairs were made or were unnecessary. You must sign the report only if defects were noted and certified to be repaired or not needed to be repaired.

Step 2: Check Engine Compartment

Check That the Parking Brakes Are On and the Wheels Chocked. You may have to raise the hood, tilt the cab (secure loose things so they don't fall and break something), or open the engine compartment door. Check the following:

  • Engine oil level.
  • Coolant level in radiator; condition of hoses.
  • Power steering fluid level; hose condition (if so equipped).
  • Windshield washer fluid level.
  • Battery fluid level, connections, and tie downs (battery may be located elsewhere).
  • Automatic transmission fluid level (may require engine to be running).
  • Check belts for tightness and excessive wear (alternator, water pump, air compressor) -­ learn how much "give" the belts should have when adjusted right, and check each one.
  • Leaks in the engine compartment (fuel, coolant, oil, power steering fluid, hydraulic fluid, battery fluid).
  • Cracked, worn electrical wiring insulation. Lower and secure hood, cab, or engine com­partment door.
Step 3: Start Engine and Inspect Inside the Cab
Get In and Start Engine
  • Make sure parking brake is on.
  • Put gearshift in neutral (or "park" if auto­matic).
  • Start engine; listen for unusual noises.
  • If equipped, check the Anti-lock Braking System (ABS) indicator lights. Light on dash should come on and then turn off. If it stays on the ABS is not working properly. For trail­ers only, if the yellow light on the left rear of the trailer stays on, the ABS is not working properly.
Look at the Gauges
  • Oil pressure. Should come up to normal within seconds after engine is started. See Figure 2.5
Engine Oil Pressure Gauge, showing close to zero

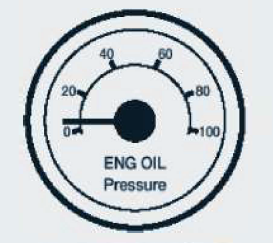
Figure 2.5: Oil Pressure

Idling: 5-20 PSI

Operating: 35-75 PSI

Low, Dropping, Fluctuating: STOP IMMEDIATELY!

Without oil the engine can be destroyed rapidly

  • Air pressure. Pressure should build from 50 to 90 psi within 3 minutes. Build air pressure to governor cut-out (usually around 120 to 140 psi. Know your vehicles requirements.
  • Ammeter and / or voltmeter. Should be in normal range(s).
  • Coolant temperature. Should begin gradual rise to normal operating range.
  • Engine oil temperature. Should begin gradual rise to normal operating range.
  • Warning lights and buzzers. Oil, coolant, charging circuit warning, DEF lighting indi­cator, and antilock brake system lights should go out right away.
Check Condition of Controls.

Check all of the following for looseness, sticking, damage, or improper setting:

  • Steering wheel.
  • Clutch.
  • Accelerator ("gas pedal").
  • Brake controls.
    • Foot brake.
    • Trailer brake (if vehicle has one).
    • Parking brake.
    • Retarder controls (if vehicle has them).
  • Transmission controls.
  • lnter-axle differential lock (if vehicle has one).
  • Horn(s).
  • Windshield wiper and / or washer.
  • Lights.
    • Headlights.
    • Dimmer switch.
    • Turn signal.
    • Four-way flashers.
    • Parking, clearance, identification, marker switch(es).
    • Diesel Exhaust Fluid (DEF).
Check Mirrors and Windshield.

Inspect mirrors and windshield for cracks, dirt, illegal stickers, or other obstructions to seeing clearly. Clean and adjust as necessary.

Check Emergency Equipment
  • Check for safety equipment:
    • Spare electrical fuses (unless vehicle has circuit breakers)
    • Three red reflective triangles, or 3 liquid burning flares.
    • Properly charged and rated fire extinguisher.
  • Check for optional items such as:
    • Chains (where winter conditions require).
    • Tire changing equipment.
    • List of emergency phone numbers
    • Accident reporting kit (packet).
Check Safety Belt.

Check that the safety belt is securely mounted, adjusts, latches properly and is not ripped or frayed.