11.4 Trailer

11.4.1 - Trailer Front

Air and / or Electrical Connections
  • Check that trailer air connectors are sealed and in good condition.
  • Make sure glad hands are locked in place, free of damage or air leaks.
  • Make sure the trailer electrical plug is firmly seated and locked in place.
Header Board
  • If equipped, check the header board to see that it is secure, free of damage, and strong enough to contain cargo.
  • If equipped, the canvas or tarp carrier must be mounted and fastened securely.
  • On enclosed trailers, check the front area for signs of damage such as cracks, bulges, or holes.

11.4.2 Side of Trailer

Landing Gear
  • Check that the landing gear is fully raised, has no missing parts, crank handle is secure, and the support frame and / or body and / or rails is not damaged.
  • If power operated, check for air or hydraulic leaks.
Doors and / or Ties and / or Lifts
  • If equipped, check that doors are not damaged. Check that doors open, close, and latch properly from the outside.
  • Check that ties, straps, chains, and binders are secure.
  • If equipped with a cargo lift, look for leaking, damaged or missing parts and explain how it should be checked for correct operation.
  • Lift should be fully retracted and latched securely.
 Frame and / or Body and / or Rails
  • Look for cracks, broken welds, holes or other damage to the frame, cross members, box, and floor.
Tandem Release Arm and / or Locking Pins
  • If equipped, make sure the locking pins are locked in place and release arm is secured.

11.4.3 Remainder of Trailer

Remainder of Trailer

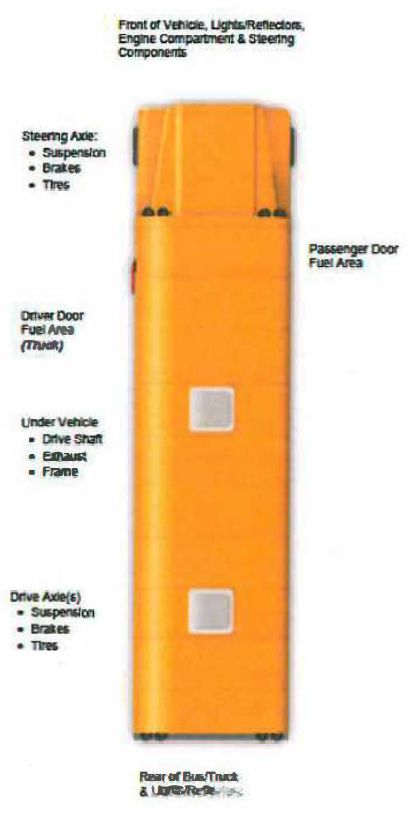
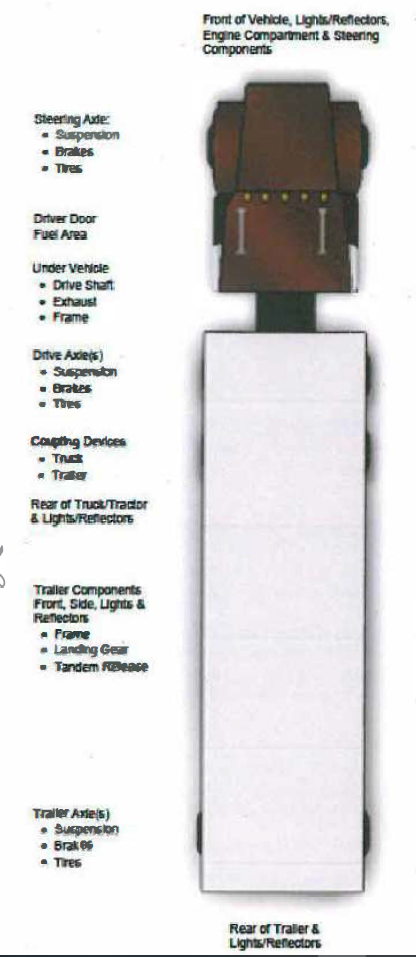
Please refer to Section 11.2 of this manual for detailed inspection procedures regarding the following components:

  • Wheels.
  • Suspension system.
  • Brakes.
  • Doors and / or ties and / or lift.
  • Splash guards or mud flaps

11.5 Coach and / or Transit Bus

11.5.1 Passenger Items

Passenger Entry and / or Lift
  • Check that entry doors operate smoothly and close securely from the inside.
  • Check that hand rails are secure and, if equipped, that the step light(s) are working.
  • Check that the entry steps are clear, with the treads not loose or worn excessively.
  • If equipped with a handicap lift, look for any leaking, damaged or missing part, and explain how it should be checked for correct operation.
  • Lift should be fully retracted and latched securely.
Emergency Exits
  • Make sure that all emergency exits are not damaged, operate smoothly, and close se­curely from the inside.
  • Check that any emergency exit warning devices are working.
Passenger Seating
  • Look for broken seat frames and check that seat frames are firmly attached to the floor.
  • Check that seat cushions are attached securely to the seat frames.

11.5.2 Entry and / or Exit

Doors and / or Mirrors
  • Check that entry and / or exit doors are not damaged and operate smoothly from the outside. Hinges should be secure with seals intact.
  • Make sure that the passenger exit mirrors and all external mirrors and mirror brackets are not damaged and are mounted securely with no loose fittings.

11.5.3 External Inspection of Coach and / or Transit Bus

Level and / or Air Leaks
  • See that the vehicle is sitting level (front and rear), and if air-equipped, check for audible air leaks from the suspension system.
Fuel Tank(s)
  • See that fuel tank(s) are secure with no leaks from tank(s) or lines.
Baggage Compartments
  • Check that baggage and all other exterior compartment doors are not damaged, operate properly, and latch securely.
Battery and / or Box
  • Wherever located, see that battery(s) are secure, connections are tight, and cell caps are present.
  • Battery connections should not show signs of excessive corrosion.
  • Check that battery box and cover or door is not damaged and is secure.

11.5.4 Remainder of Coach and / or Transit Bus

Remainder of Vehicle

Please refer to Section 11.2 of this manual for detailed inspection procedures for the remainder of the vehicle.

Remember, the pre-trip inspection must be passed before you can proceed to the basic vehicle control skills test.


11.6 Taking the CDL Pre-trip Inspection Test

11.6.1 Class A Pre-trip Inspection Test

If you are applying for a Class A CDL, you will be required to perform one of the four ver­sions of a pre-trip inspection in the vehicle you have brought with you for testing. Each of the four tests are equivalent and you will not know which test you will take until just before the testing begins.

All of the tests include an engine start, an in-cab-inspection, and an inspection of the coupling system. Then, your test may require an inspection of the entire vehicle or only a portion of the vehicle which your CDL Examiner will explain to you.

11.6.2 Class Band C Pre-trip Inspection Test

If you are applying for a Class B CDL, you will be required to perform one of the three versions of a pre-trip inspection in the vehicle you have brought with you for testing. Each of the three tests are equivalent and you will not know which test you will take until just before the testing begins.

All of the tests include an engine start and an in-cab inspection. Then, your test may require an inspection of the entire vehicle or only a por­tion of the vehicle which your CDL Examiner will explain to you. You will also have to inspect any special features of your vehicle (e.g, school or transit bus).

Combination vehicle, long description is under the heading "Long descriptions" at the end of this document
Caption
Combination Vehicles
Straight truck or bus, long description is under the heading "Long descriptions" at the end of this document
Caption
Straight Truck or Bus