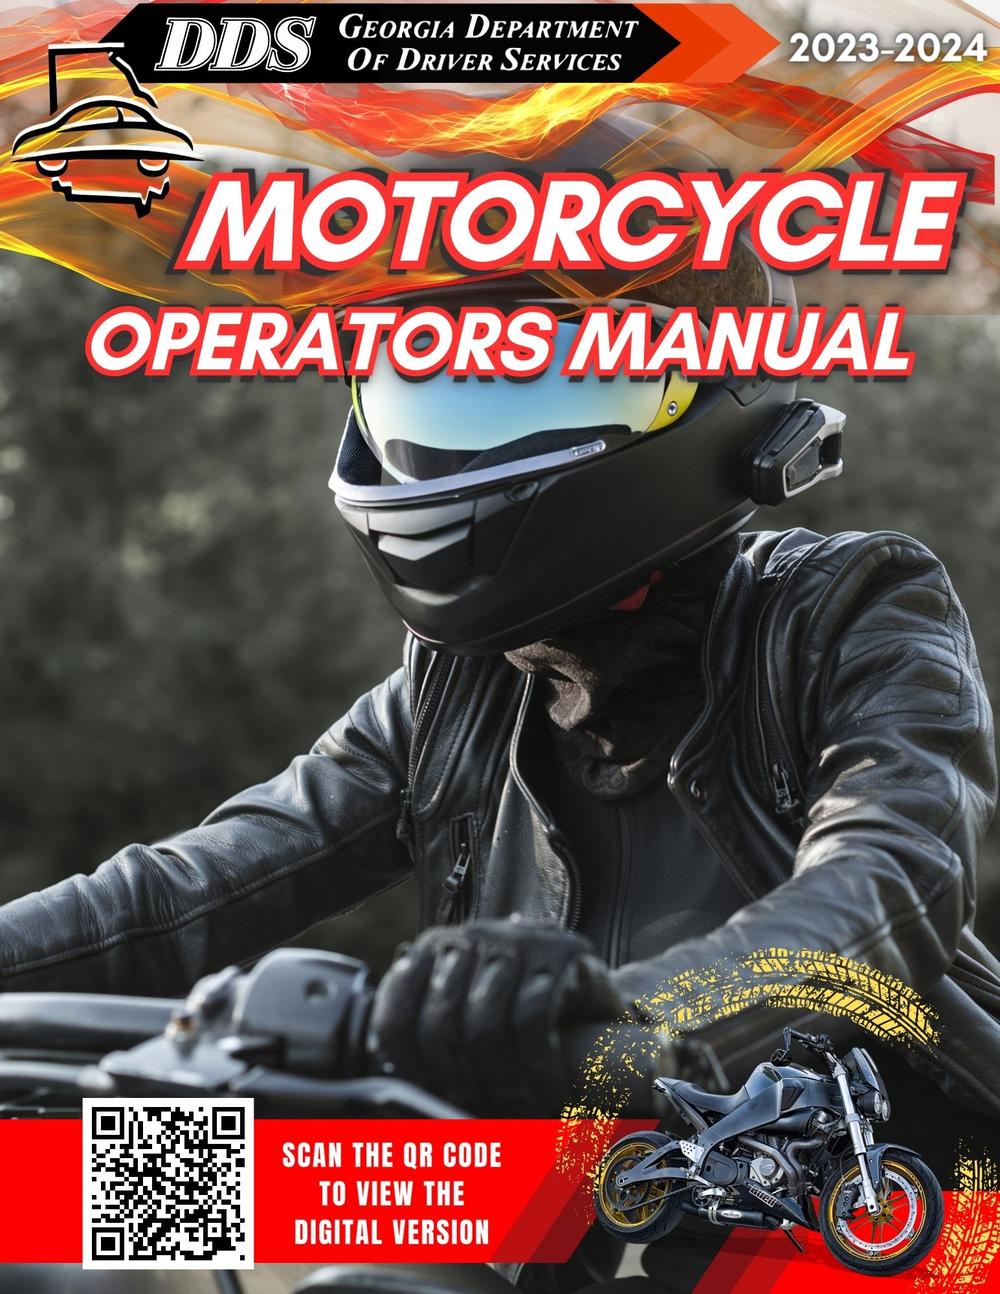
01_Cover.jpg
An official website of the State of Georgia.
The .gov means it’s official.
Local, state, and federal government websites often end in .gov. State of Georgia government websites and email systems use “georgia.gov” or “ga.gov” at the end of the address. Before sharing sensitive or personal information, make sure you’re on an official state website.
Still not sure?
Call 1-800-GEORGIA to verify that a website is an official website of the State of Georgia.
To provide secure driver and identity credentials to our customers with excellence and respect.
#Reimagining Driver Services in 2023
The Georgia Department of Driver Services (DDS) is committed to compliance with Title VI of the Civil Rights Act of 1964 and all related nondiscrimination authorities. DDS assures that no person shall, on the grounds of race, color, national origin, sex, age, disability, low-income, and Limited English Proficiency (LEP), be excluded from participation in, be denied the benefits of, or be otherwise subjected to discrimination under any program or activity. DDS further assures that every effort will be made to ensure nondiscrimination in all programs and activities, whether or not those programs and activities are federally funded. In addition, DDS will take reasonable steps to provide meaningful access to services for persons with Limited English Proficiency. Finally, DDS agrees to abide by the Title VI Program Assurances and to ensure that written agreements with any party for federally funded programs or services will include the applicable Title VI language as provided in the Title VI Program Assurances.
The DDS Title VI Program Coordinator is responsible for oversight of the Title VI Program and ensuring compliance with the requirements provided in 49 Code of Federal Regulations (C.F.R) Part 21 and 49 C.F.R. Part 303. The Title VI Program Coordinator and all Division Directors are authorized to effectively implement the Title VI Program on behalf of the Department.
Be certain to take advantage of DDS Online Services and avoid an unnecessary trip to a Customer Service Center.
DDS Online Services enable thousands of Georgia drivers to conduct many transactions via the DDS website and eliminate a visit to a DDS Customer Service Center (CSC). This saves customers valuable time and money. DDS does not charge an additional fee for choosing Internet Services. A $5.00 discount may apply for eligible license types that are renewed on the internet.
For more information visit the DDS website and like DDS on Facebook!
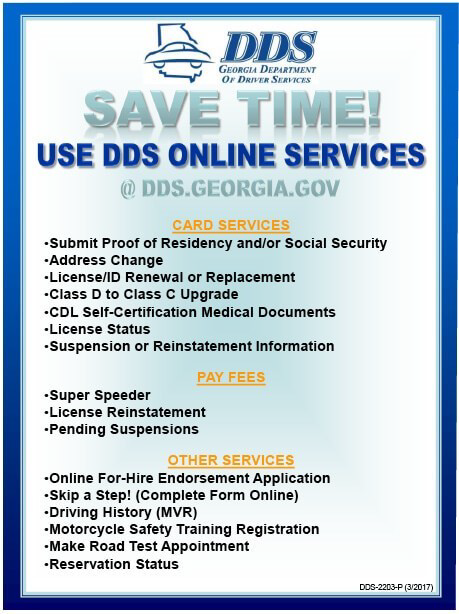
Card Services
Pay Fees
Other Services
The information contained in this publication is intended for motorcycle operators; it does not address all laws, restrictions, requirements and other issues that all highway users must know and observe in order to safely and responsibly operate a motor vehicle on Georgia’s roadways. Motorcycle operators are also required to read and understand the information contained in the Georgia Drivers Manual. This manual is available from all Department of Drivers Services Customer Service Centers and may be viewed at the DDS website.
The information contained in this publication is offered for the benefit of those who have an interest in riding motorcycles. The information has been compiled from publications, interviews and observations of individuals and organizations familiar with the use of motorcycles, accessories, and training. Because there are many differences in product design, riding styles, federal, state and local laws, there may be organizations and individuals who hold differing opinions.

Introduces the exciting world of motorcycling.
Successful graduates earn their Motorcycle License with a 90-day license test waiver!
An excellent refresher course for renewing and practicing basic riding skills.
Successful graduates earn their Motorcycle License with a 90-day license test waiver!
Complements a rider’s basic skills and includes a fast paced classroom segment with several interactive activities to improve perception and hazard awareness.
The Georgia Motorcycle Safety Program (GMSP) is a part of the Georgia Department of Driver Services. GMSP’s purpose is to improve the safety of motorcyclists on Georgia’s streets and highways. In addition to offering rider education training, licensing improvement, and public information, GMSP promotes motorist awareness programs, share the road campaigns, and is focused on highway safety issues. GMSP directly operates training sites throughout Georgia.
For information about the Georgia Motorcycle Safety Program visit dds.georgia.gov/motorcycle-safety-program or call (678) 413-8400.
Check the DDS website for new training sites added after publication.
Visit the DDS website & select Regulatory Compliance/Georgia Motorcycle Safety Program or call (678) 413-8400.
"I wish you safe passage and encourage you to exercise good judgment, follow driving laws, and prioritize safety for yourself, fellow motorists, and passengers."
Brian P. Kemp
Governor


"Operating a motorcycle is a tremendous responsibility and we want you to be fully prepared to meet the challenges! By wearing the appropriate gear, obeying all traffic laws and never drinking and riding, we can ensure that our highways are safer for riders, drivers and passengers alike.”
Spencer R. Moore
Commissioner
Our Board of Directors would like to remind all customers that driving in Georgia is a privilege that carries many responsibilities. Please be a safe and dependable driver to ensure that this privilege will not be lost. This manual has two main purposes:
This guide is designed to provide you with the information to obtain and keep this type of license. Other manuals are available for commercial drivers and teens learning to drive.
Operating a motorcycle can be safe and fun when you act as a responsible rider. It also requires special skills and a heightened sense of awareness about other road users, traffic, and environmental conditions and a personal strategy to manage potential problems.
Studying this manual will not only help you pass your licensing tests, but it will also help prepare you to become a responsible and safe motorcyclist.
Take your time learning how to operate your motorcycle and get plenty of riding experience and training. You’ll need to be fully prepared for handling today’s traffic environment and reducing the potential for a crash.
You may obtain a Class M Motorcycle License if you:
An Instructional (Learner’s) Permit is issued for the purpose of learning how to operate a motorcycle on public roads or highways. An Instructional Permit is not a Motorcycle License.
All Instructional Permit applicants must pass a vision test and an examination of motorcycle knowledge. A Class M Instructional Permit (MP) is valid for 6 months. It is not mandatory for a Class M License applicant to obtain a Class M Instructional Permit (MP) before taking the Class M examination, although road test reservations are available only to those applicants who hold a Class M Instructional Permit (MP). Requirements for a Class M Instructional Permit (MP) are as follows:
MP Restrictions are:
DDS has been issuing Real ID compliant licenses and IDs since 2012. These procedures require that you bring additional documentation with you when you visit one of our Customer Service Centers (CSC).
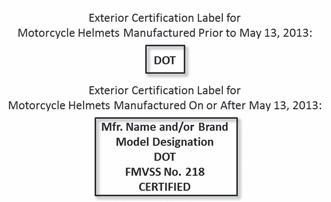
To verify that you have a Real ID card, check the upper right-hand corner of your license/ID for either a Black star or Gold star.
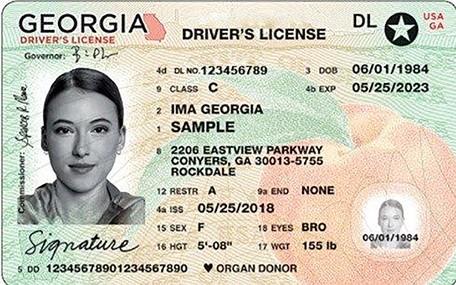
If you are a US Citizen and have a Real ID card, you will NOT need to bring your documents in again unless you are performing a name change, gender change or other services that require identification verification.
If you are new to Georgia or do not have a Real ID license, please visit the DDS website's Real ID Requirements page to identity which documents you will need to bring.
When looking at different types of motorcycles or motor-driven cycles, you will see the term “cc” along with a number: 250cc, 500cc, 750cc. The “cc” is an abbreviation for cubic centimeter, the volume of fuel mixed with air that powers motorcycles. Road-legal motorcycles, scooters, and even mopeds can have engines ranging from 50cc to more than 2,000cc. A motorcycle with a higher cc will weigh more and therefore have more power and be able to move more weight at faster speeds.
Every motor vehicle having a saddle for the use of the rider, is controlled by handlebars, and designed to travel on not more than three wheels in contact with the ground, but excluding a tractor and moped (with engine size not exceeding 50cc), is defined as a motorcycle. Georgia law places all types of motorcycles (including scooters, motorbikes and mini-bikes with engine size 51cc or greater) into one classification. All are considered motor-driven cycles. A Class M License or a Class M Instructional Permit (MP) is required to legally operate a motorcycle or motor-driven cycle in Georgia.
A moped is defined as any motor driven cycle with an engine not exceeding 50cc (3.05 cubic inches). Mopeds are exempt from the provisions relating to the registration and licensing of motor vehicles.
Rules to operate mopeds on Georgia roads and highways:
Safe riding requires knowledge and skill. Licensing tests are the best measurement of the basic skills necessary to operate safely in traffic. Assessing your own skills is not enough. People often over-estimate their own abilities. It’s even harder for friends and relatives to be totally honest about your skills. Licensing exams are designed to be scored more objectively.
There are two ways to earn a motorcycle license. You can take a Georgia Motorcycle Safety Program Course where you will receive professional training in motorcycle handling (motorcycles are provided) as well as earn a License Test Waiver (if you successfully complete the course).
The License Test Waiver will allow you to bypass the knowledge test and the on-cycle skills test at a DDS Customer Service Center. See the section on the Georgia Motorcycle Safety Program in this manual.
The other method is to apply directly at a DDS Customer Service Center. To earn your license, you must pass a knowledge test and an on-cycle skills test (on your own motorcycle). You must also pass a vision test. If the vision test was administered and passed during the year in conjunction with another license issuance, this vision test may be waived.
Knowledge Test – you will need to take and successfully pass the Knowledge test. Knowledge test questions are based on information, practices and ideas from this manual. They require that you know and understand road rules and safe riding practices. NOTE: This requirement is waived for applicants who have successfully completed a Georgia Motorcycle Safety Program License Test Waiver rider education course.
Rider Skills Test – you will need to take and successfully pass an on-cycle skills test, which consists of a series of exercises designed to demonstrate your basic skills in operating a motorcycle. NOTE: This requirement is waived for applicants who have successfully completed a Georgia Motorcycle Safety Program 90-Day License Test Waiver rider education course.
You must furnish a motorcycle for the test and pass a safety inspection of the motorcycle by the DDS license examiner before the on-cycle skills test is given.
Basic vehicle control and crash-avoidance skills are included to determine your ability to handle normal and hazardous traffic situations.
The on-cycle skills test is designed for single-track vehicles (motorcycles) and multi-track vehicles (motorcycles with sidecars, and three-wheeled vehicles). Motorcycles with sidecars and three-wheeled vehicles maneuver differently than a two-wheeled single-track motorcycle. Vehicles outside of test standards may be required to use a car test route. Please be mindful on-cycle testing cannot be completed in an autocycle (i.e. three-wheel car-like vehicles).
All riders are also encouraged to attend a rider education course which provides knowledge and hands-on training before receiving a motorcycle operator’s license.
Under the Georgia Motorcycle Safety Program (see section "1.1 How to obtain your class M motorcycle license), you may earn a License Test Waiver for your Class M Motorcycle License in the Basic RiderCourse and Basic RiderCourse 2. A 90-day license test waiver is provided to successful graduates.
Check out the rider education courses at The Georgia Motorcycle Safety Program.
You can also view rider education courses online at the DDS website.
Safe motorcycle riding depends largely on your knowledge and skills. The skills for motorcycling require a lot of practice. If you have just learned to handle a motorcycle and have very little riding experience, then the most important part of learning to ride is still ahead.
You may wish to take a Georgia Motorcycle Safety Program rider education course that offers a License Test Waiver. For more information about locations and schedules, visit the DDS website.
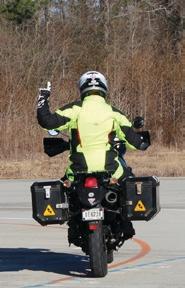
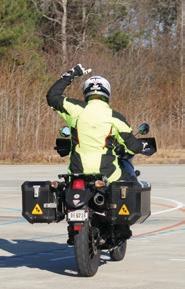
The Rider Skills Test (RST) is used for both two-wheeled (RST-2W) and three-wheeled vehicles (RST-3W). The following pages highlight the testing patterns for both the two-wheel and three-wheel test.
Both tests consist of four riding evaluations that measure your control of the motorcycle and your hazard-response skills. The final two exercises involve speeds of about 15-20 miles per hour.
You will be scored on time/distance standards as well as path violations. The test may be ended early for point accumulation, committing an unsafe act, or failure to understand or follow instructions.
When you report for your test:
PLEASE NOTE: You have the right to cancel the test at any time. Inform the DDS driver examiner that you do not wish to continue the test. The examiner will explain the conditions for rescheduling the test.
The DDS license examiner also has the right to stop the test if you (a) fail to demonstrate basic control skills, (b) accumulate more than the maximum number of penalty points allowed, (c) commit any unsafe act (d) fail to understand or follow directions, or (e) fall from or drop the motorcycle.
Finally, all testing may be suspended due to inclement weather, equipment failure or other circumstances beyond the control of you or the examiner.
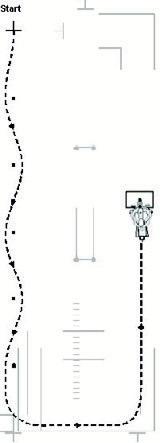
Directions:
From the start point ride to the right of the first cone, to the left of the second, and so on.
After passing the last cone, turn left and ride toward the opposite side of the course. Make a smooth, non-skidding stop with your front tire inside the box.
Points will accumulate if you:
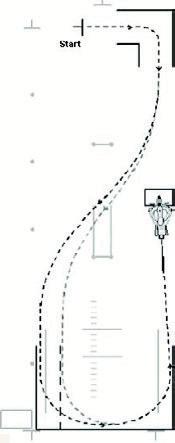
Directions:
From the start point make a right turn between the boundary lines.
After completing the turn, diagonally cross to the opposite side of the course and make a left U-Turn inside the painted box at the far end of the course. Do not touch the solid (24') line for motorcycles 600cc or more, or the dashed (20') line for motorcycles less than 600cc.
Stop with your front tire inside the box.
Points will accumulate if you:
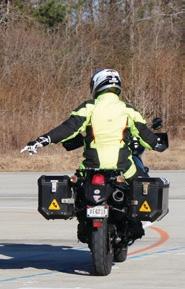
Directions:
From the start point accelerate straight up the path. Stabilize your speed between 12-18 mph by the time you reach the first line. Maintain a steady speed.
When your front tire crosses the second line, stop as fast as you safely can, using both brakes.
This test will be timed in order to determine your speed.
Points will accumulate if you:
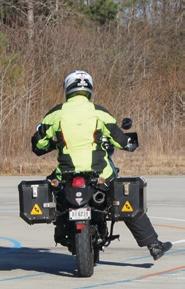
Directions:
From the start point accelerate straight up the path. Stabilize your speed between 12-18 mph by the time you reach the first line. Maintain a steady speed.
When your front tire passes the second line, swerve to the left or right as directed.
This test will be timed in order to determine your speed.
Points will accumulate if you:
Once you have successfully passed all of the required tests and met all other licensing requirements you may be issued a Class M Motorcycle License.
The MSF (Motorcycle Safety Foundation) is proud to partner with Georgia Department of Driver Services to bring its cutting edge curriculum to the current prospective riders of Georgia.
The best first ride is an MSF RiderCourse℠.
Successful completion of the MSF Basic RiderCourse waives the DDS Motorcycle License test.
Get trained – get licensed.
msf-usa.org
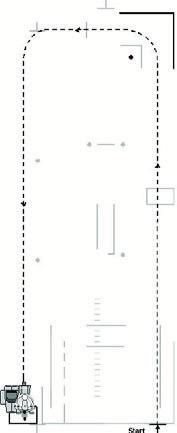
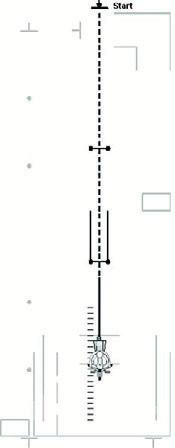
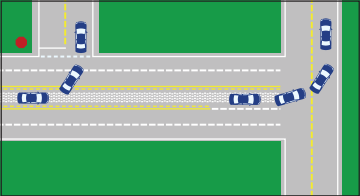
Directions:
From the start point ride straight ahead and make a sharp left turn between the boundary lines and the single cone marker.
Then ride toward the opposite end of the course. Make a smooth, non-skidding stop with your front tire inside the box. (Left front tire on vehicles with two front tires).
Points will accumulate if you:
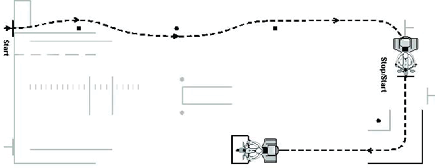
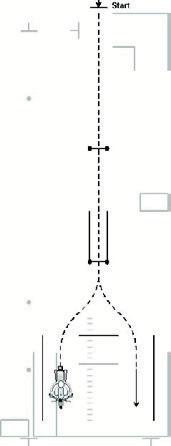
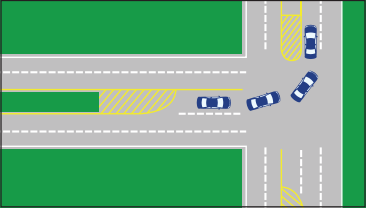
Directions:
From the start point ride to the left of the first cone, to the right of the second and to the left of the third.
After passing the last cone turn right at the end of the course and stop at the Start “T” facing the other side of the course. Then make a right hand turn between the boundary lines and the cone.
Make a smooth, non-skidding stop with your front tire inside the box.
Points will accumulate if you:
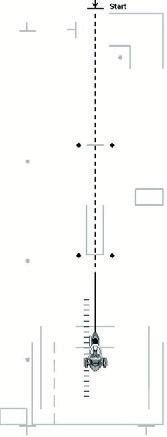
Directions:
From the start point accelerate straight up the path. Stabilize your speed between 12-18 mph by the time you reach the first set of cones. Maintain a steady speed.
When your front tire crosses the second set of cones, stop as fast as you safely can, using both brakes.
This test will be timed in order to determine your speed.
Points will accumulate if you:
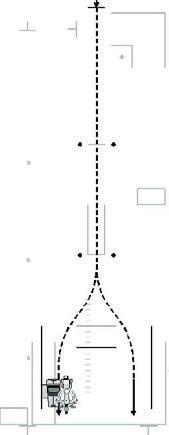
Directions:
From the start point accelerate straight up the path. Stabilize your speed between 12-18 mph by the time you reach the first set of cones. Maintain a steady speed.
When your front tire passes the second set of cones, swerve to the left or right as directed.
This test will be timed in order to determine your speed.
Points will accumulate if you:
Once you have successfully passed all of the required tests and met all other licensing requirements you may be issued a Class M Motorcycle License.
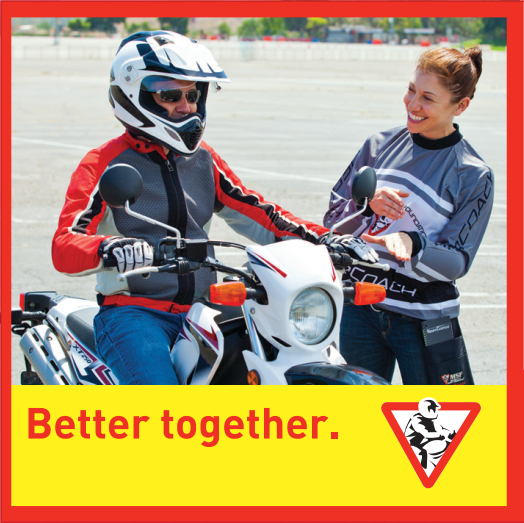
The Georgia Motorcycle Safety Program (GMSP) offers rider education programs for every level of rider. GMSP also promotes motorist awareness programs, Share the Road campaigns, and focuses on highway safety issues affecting Georgia motorcyclists. The DDS directly operates 14 training sites throughout the state of Georgia. Rider training is popular and potentially life-saving. Without proper training, new riders are more likely to be involved in a crash. Experienced riders also can benefit from additional training to hone their crash-avoidance skills.
DDS is pleased to announce that the License Test Waiver Program has been expanded to include the Three Wheel Training Course. Since July 1, 2017, certified Motorcycle Training Schools that offer this training have the ability to issue a 90-day license test waiver upon successful completion of the course. This expansion is being implemented to enhance customer service, expand the Motorcycle Safety Program and to foster consistency.
When you take a Georgia Motorcycle Safety Program Course, you will receive professional training in risk management, motorcycle operation, and skilled riding techniques as well as earning a License Test Waiver (when you successfully complete a license test waiver course).
The License Test Waiver will allow you to bypass the knowledge test and the on-cycle skills test at a DDS Customer Service Center.
You may earn a License Test Waiver for your Motorcycle License in the Basic RiderCourse and Basic RiderCourse 2 License Waiver Course. A 90-day license test waiver is furnished to successful graduates. Courses are low-cost and provide professional training to assist riders in improving their skills in:
The Basic RiderCourse is the best way to prepare to obtain your motorcycle license. With no experience necessary, it is designed for beginning riders with no previous riding experience. We also recommend this course for riders who have not been on a motorcycle for a while. It combines practice riding on a closed course with classroom discussion.
GMSP provides training motorcycles and helmets at our DDS locations (there are additional riding gear requirements for students). If you own a scooter, you may ride your own scooter, 51-500cc, in the course. Scooter students must call GMSP at 678-413-8400 after registering and inform staff of their intention to use a scooter so we can notify your Coach.
The Basic RiderCourse offers complete and professional training. You will learn how to operate a motorcycle safely, with emphasis on the special skills and mental attitudes necessary for dealing with traffic. GMSP Coaches will start off with straight-line riding, turning, shifting and stopping.
You’ll gradually progress to cornering, swerving and stopping in shorter distances. In the classroom, you’ll learn about the different types of motorcycles, their characteristics, how they operate, and mental processes for riding.
The GMSP Coaches, all experienced motorcyclists, will advise you on what to wear for comfort, visibility and protection. You’ll find out how alcohol and other drugs affect your ability to ride safely. A very important segment of the course will introduce a strategy for riding in traffic, and how to deal with critical situations. The course concludes with a knowledge test and an on-cycle skills evaluation.
Once you successfully complete the course, you will receive a 90-day motorcycle license test waiver. To register, go to the DDS website, or call 678-413-8400.
If you are an experienced rider without a motorcycle license or have been riding on a permit, earn your license now.
To register, go to the DDS website, or call 678-413-8400.
The ARC is a one-day course that complements a rider’s basic skills and helps with personal risk assessment. It focuses on the complex skills of self-assessment, personal risk management, and riding strategies.
The ARC includes a fast-paced classroom segment with several interactive activities to improve perception and hazard awareness. Range exercises enhance both basic skills and crash avoidance skills. Improving braking and cornering finesse is emphasized. The course is beneficial for riders on any type of street motorcycle. For details and a list of facts including required riding gear, visit http://dds.georgia.gov/advanced-riders-course.
To register, go to the DDS website, or call: 678-413-8400.
Scooters have become a popular and sensible transportation option. Many people perceive them to be safer and easier to handle than a motorcycle. The reality is that any two-wheel vehicle takes a different skill set to maneuver on the street.
With that in mind, the GMSP welcomes scooter owners to participate in our License Waiver Basic and Basic 2 rider education courses. Scooter owners can now use their machine in a rider education program, and if successful, earn a license test waiver.
Of course, there are a few rules.
A military member or dependent will not be subject to taking a knowledge test or skills test as if he/she has completed a class offered by the Georgia Motorcycle Safety Program and/or recognized private sites.
Military members and dependents will be eligible to obtain a 90 day license waiver by submitting the following documents to the Motorcycle Safety Program:
Once the documentation has been verified, a 90 day license waiver will be updated to his/her driving record. After receiving the waiver, the military member/dependent must visit their local DDS Customer Service Center within 90 days to obtain their Class M license. A military member or dependent that is not currently in the State of Georgia can go to the DDS website for information on renewing a license by mail.
Georgia law requires that all drivers, including motorcyclists, obey official highway signs and traffic control signals unless otherwise directed by a police officer or emergency worker.
The State of Georgia uses seven basic shapes of signs to convey traffic control instructions. Drivers should know signs by their shapes and colors so that they may recognize them from a distance and begin reacting.
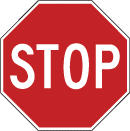
An Octagon (eight-sided shape) always means stop. When you come to it, you must make a complete stop at a marked stop line. If there is no stop line, stop before the crosswalk on your side of the intersection. If there is no crosswalk, stop at a point from which you can best see oncoming traffic. You must not start again until all pedestrians have finished crossing on the side of the roadway you are traveling on, and you have yielded the right-of-way to closely approaching traffic.
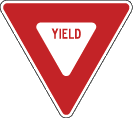
Triangle signs mean yield. You must slow down to a speed that is reasonable for existing conditions and stop if necessary. If you must stop, do so at a marked stop line, if it exists. After slowing or stopping, you must yield the right-of-way to other vehicles in the intersection or approaching closely on another roadway or auxiliary road leading into a major highway.
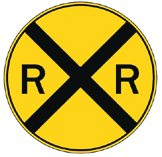
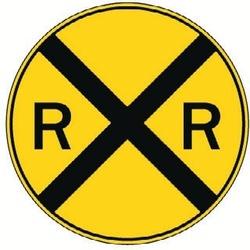
Round signs mean you are approaching a railroad crossing. This sign is posted a few hundred feet in front of the tracks and alerts you to slow down, look, listen and prepare to stop. Listen carefully for an approaching train. If the train is approaching, stop! Do not try to calculate whether you can “make it” across the track. Never try to beat a train through the intersection. Passing is prohibited at all railroad crossings.
Diamond shaped signs warn of existing or possible hazards on roadways or adjacent areas. They are yellow with black words indicating the potential hazard, or black symbols visually describing the potential hazard.
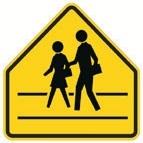
Pentagon shaped signs mean you are approaching a school zone and/or school crossing. When used, they will be erected not less than 150 feet nor more than 700 feet in advance of the school grounds or school crossing. (Warning signs can sometimes be fluorescent green in color.)
Horizontal Rectangle signs are generally used as guide signs. They show locations, directions, or other special information.
Vertical Rectangle signs are generally used for regulatory signs, which tell you what you must do. You must obey them in the same manner as traffic laws.
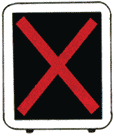
Regulatory signs tell drivers what they may or may not do. Drivers, including bicyclists, must obey them in the same manner as traffic laws. Remember, a red circle with a red slash from upper left to lower right means “No.” The picture within the circle shows what is prohibited.
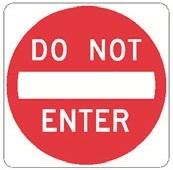
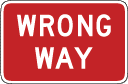
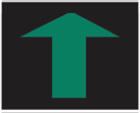
This marks a one-way road. If you are facing this sign traffic is coming toward you. You must not continue down the road.
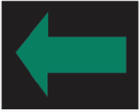
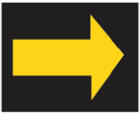
Motorist is approaching a one-way highway or ramp.
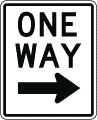
Motorist may travel only in the direction of the arrow.
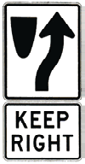
Traffic is required to keep to the right of medians or obstructions.
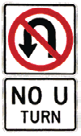
Motorist cannot turn around to go in the opposite direction at this intersection.
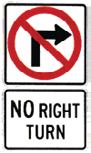
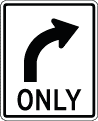
Motorist cannot make a right turn at this intersection.
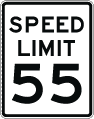
55 miles per hour is the maximum speed limit permitted in this area.
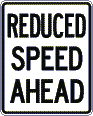
Motorist is approaching an area where a reduced speed limit has been established.
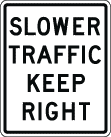
When two or more traveling lanes are available in the direction you are traveling, slower traffic should travel in the right (outside) lane(s).
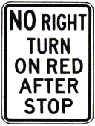
A right turn on red is prohibited, even after coming to a complete stop.
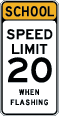
Motorist is approaching a school zone. A reduced speed limit is in effect when the yellow lights are flashing.

Bicycles are prohibited from entering this roadway.
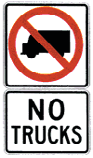
Trucks are prohibited from entering this roadway.
Warning signs are usually yellow with black markings. (Warning signs can also be fluorescent green with black markings.) They alert you to conditions that are immediately ahead. There may be road hazards, changes in traffic direction or some other potentially hazardous situation that requires action on your part.
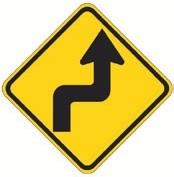
Sharp turn to the right and then sharp turn to the left.
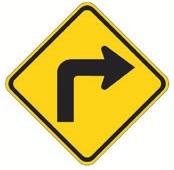
Sharp turn to the right.
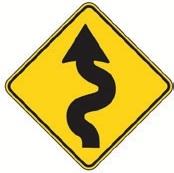
Winding road ahead.
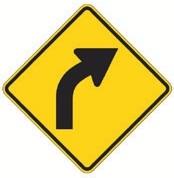
Curve to the right.

Side road enters highway ahead.
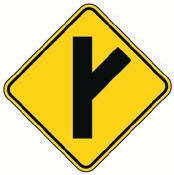
Side road enters highway ahead at an angle.
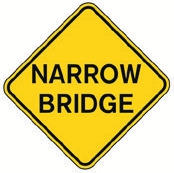
The bridge ahead allows room for only two lanes of traffic. Approach with caution.
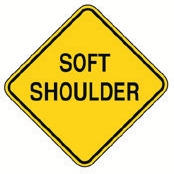
Shoulder of the road is soft. Drive on the shoulder only in emergencies.
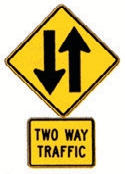
Warning that you are leaving a separated one-way highway and will soon be driving on a two-way highway.
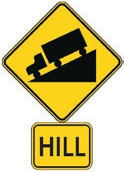
Steep hill ahead. Slow down and be ready to shift to lower gear to control speed and protect brakes from damage.
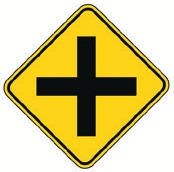
Another road crosses the highway ahead.
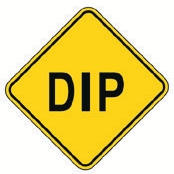
There is a dip in the road ahead. Slow down!
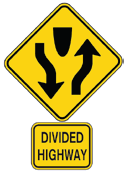
Divided highway begins. Prepare to change lanes or shift lane position.
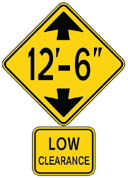
Approaching a low underpass. Do not enter if your vehicle or cargo exceeds the maximum height indicated on the sign.

Presence of traffic signals at intersection ahead. Slow down!
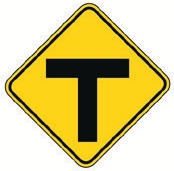
The road you are traveling on ends straight ahead. Slow down and prepare to yield or stop before turning right or left.
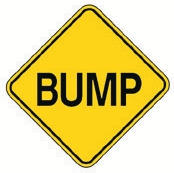
There is a bump in the road ahead. Slow down!
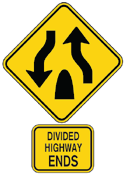
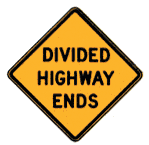
Divided highway ends. Prepare to change lanes or shift lane position.
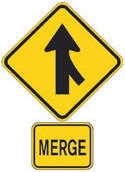
Traffic merging from the right. Prepare to allow traffic to safely merge.
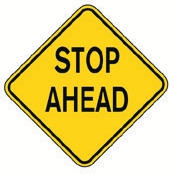
There is a stop sign ahead. Begin to slow down.
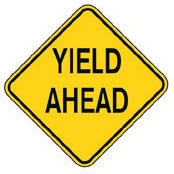
There is a yield sign ahead. Slow down and prepare to stop if necessary.
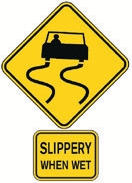
Roadway is slippery when wet. Remember, the first half-hour of rain is most hazardous.
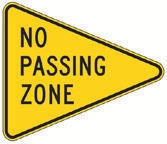
This sign is on the left side of the highway and marks the beginning of a no passing zone. Any passing maneuver must be completed before reaching this sign.
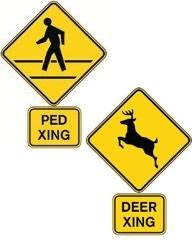
These signs alert drivers in advance of areas where animals, people, and vehicles may be crossing.
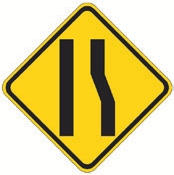
Number of lanes reduced ahead.

Drivers must stop and stay stopped when pedestrians are in the crosswalk.
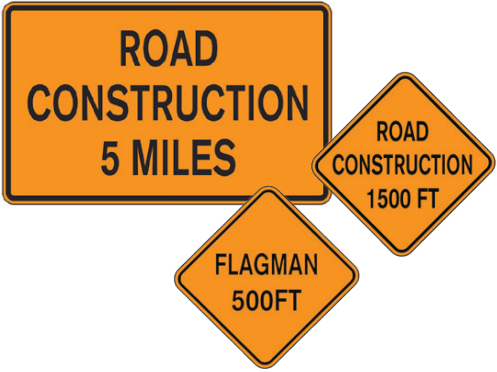
Warning signs for construction and maintenance projects are used to alert you to dangers ahead and give you enough time in which to adjust your speed accordingly. These signs are orange with black markings.
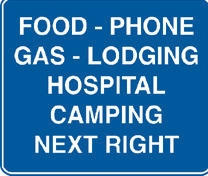
While traveling along Georgia’s highways, the following blue and white signs will give directions to service facilities.
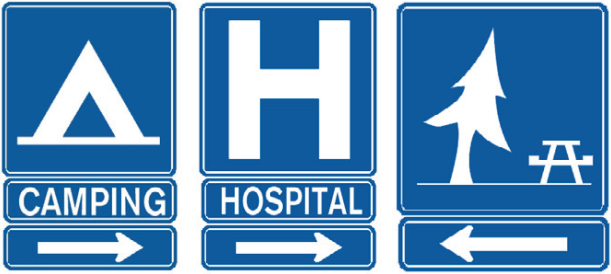
Guide signs may indicate what road you are on, and how to get to your destination. Many guide signs are rectangular, but some have other shapes. There are several different kinds of guide signs — route markers, information, destination, distance, and location signs. These signs may be accompanied by a “To” sign or an arrow, indicating the highway, facility, or location that can be reached by following the signs. Here are some examples:
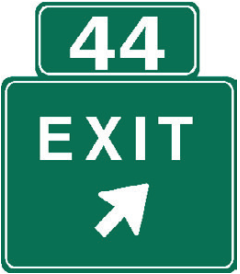
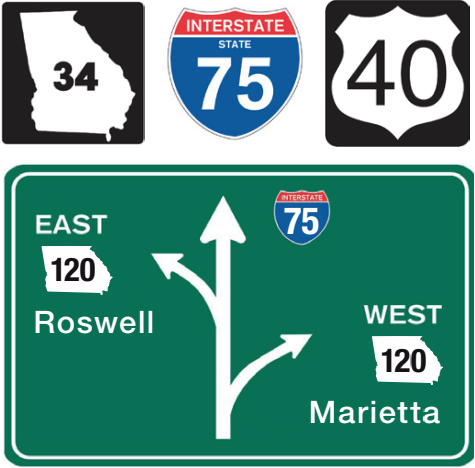
The numbers on these signs designate specific exits, interstates or highways.
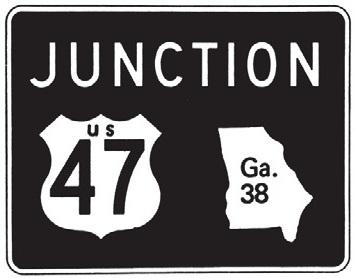
Intersection of U.S. Route 47 & Ga. Highway 38. These roads are going to cross or meet the highway you are traveling on.
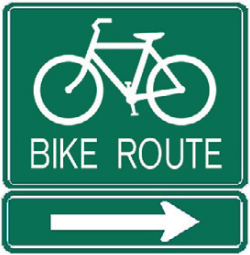
This sign marks an officially designated bicycle route. Be cautious of bicyclists while traveling on this road.
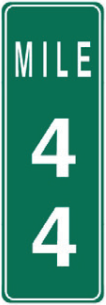
Milepost markers are placed each mile along the edge of the roadway from one end of the state to the other. Zero always starts at the south or west border where a route begins.

Caution - a vehicle displaying this emblem is a slow moving vehicle. A slow-moving vehicle is defined as any vehicle moving less than 25 miles per hour. They are required by law to display this emblem.
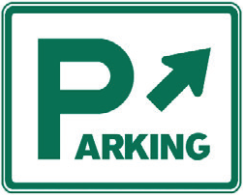
This sign means there is a public parking area in the direction of the arrow.

The cross-buck is placed at all railroad crossings. Yield to any approaching trains. Slow down, look and listen before crossing. A sign below the cross-buck indicates the number of tracks. A complete stop is required when a red light is flashing.
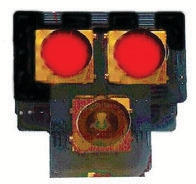
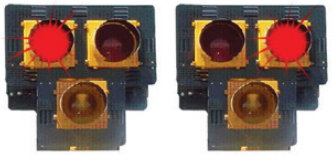
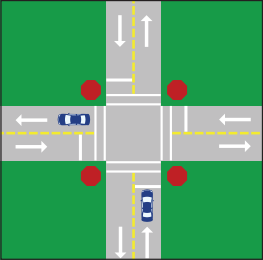
Traffic signals are placed at intersections to control the orderly movement of traffic and to prevent crashes. Drivers (including bicyclists) and pedestrians must obey these signals except when an officer is directing traffic. If a traffic signal is not functioning at all at an intersection, all drivers must treat the intersection as if a stop sign is posted for all directions. If a traffic signal is malfunctioning and flashing, drivers must proceed based on the color of the flashing signal they are facing: if the driver is facing a yellow flashing signal, the driver may proceed with caution; if the driver is facing a red flashing signal, the driver must stop and wait until it is safe to proceed.

A red light means you must make a complete stop before entering the crosswalk or intersection and wait until the light turns to green before proceeding.

A yellow light warns that the light is changing from green to red. Slow down and prepare to stop.

A green light means you may proceed if it is safe to do so after stopping for pedestrians and yielding to vehicles within the intersection.
A green arrow means you may proceed carefully only in the direction the arrow is pointing after stopping for pedestrians and yielding to vehicles within the intersection. In this case you may go straight ahead only.
A green arrow, in this case, means you may turn in the direction of the arrow after stopping for pedestrians and yielding to vehicles within the intersection.
A yellow arrow may appear after a green arrow and warns you to clear the intersection.

A red flashing light means you must stop completely (treat as you would a stop sign). Proceed with caution only after yielding the right-of-way to pedestrians and to other vehicles at the intersection.

A yellow flashing light means you must slow down and exercise caution before proceeding through the intersection.
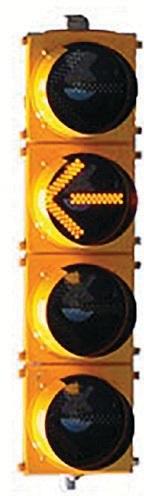
A flashing yellow arrow means you may turn left after yielding to oncoming traffic and pedestrians (oncoming traffic still has the green light).
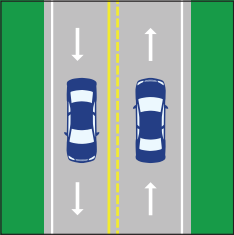
Some roadways are designed to accommodate different traffic demands during the day through the use of a reversible lane system. Appropriate travel lanes on a roadway utilizing a reversible lane system are indicated as follows:
No travel allowed in this lane in the direction you are going.
“Steady” — clear the lane “Flashing” — left turn permitted

Travel in lane.
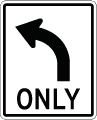
Left turn only.
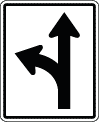
Straight or left turn only.
Right turn only.
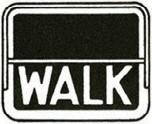
Leave the curb to cross the street.
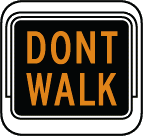
Do not leave curb.
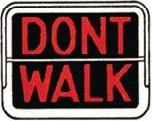
Flashing — do not leave curb, but complete walking across the street if already started.
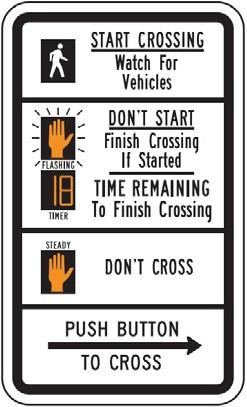
“HAWK’ stands for High-Intensity Activated Crosswalk. This signal is also known as a Pedestrian Hybrid Beacon (PHB), and it is designed to help pedestrians safely cross busy streets. Pedestrians push a button to activate the overhead beacon and stop road traffic. When WALK appears on the Pedestrian signal, pedestrians can cross the street.
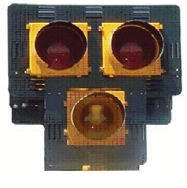
The HAWK remains DARK for traffic unless a pedestrian activates the push-button.
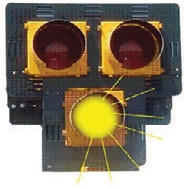
When a pedestrian presses the button, the signal is activated. Approaching drivers will see a FLASHING YELLOW signal for a few seconds.
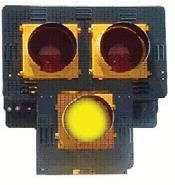
The flashing yellow is followed by a SOLID YELLOW signal, indicating drivers should reduce speed and be prepared to stop.
The solid yellow is followed by double SOLID RED signals, requiring drivers to stop.
The double solid red signals are followed by alternating FLASHING RED signals. This requires drivers to come to a full STOP, and proceed when pedestrians have cleared the crosswalk. The signal will then go dark until activated again by a pedestrian.
Pavement markings, like highway signs, are used to warn and direct drivers to regulate traffic.
Stop lines are white lines painted across the pavement at intersections indicating the point beyond which your vehicle should not cross if you are stopping for a traffic control device. In urban areas the line is usually located about four feet before the crosswalk. Drivers must come to a complete stop at the stop line, when present, not at the actual stop sign or traffic signal.
These white lines are painted across, or partially across the pavement. Sometimes they will be painted in a ladder pattern. When pedestrians are in the crosswalks, they have the right-of-way over motor vehicles. Crosswalks are sometimes in the middle of a block in residential areas, and in some cases, a pedestrian crossing signal is located at the white line.
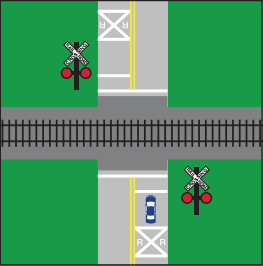
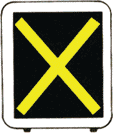
When a road is crossed by a railroad crossing, the pavement is usually marked with a large X and two R’s. At railroad crossings, a yellow line is always placed on the right side of the center line to prevent passing. The crossing is sometimes equipped with control arms and/or emergency lights, to warn drivers of approaching trains. The driver of the vehicle must stop if warning signals indicate a train is approaching
These are used to separate traffic moving in opposite directions on paved roadways. Broken yellow lines are used when there are only two lanes.
These single, solid yellow lines on two-lane roads indicate zones where passing is prohibited. They will be located on the right of the broken yellow line when they apply to the lane in which you are traveling. In some instances, both yellow lines will be solid, indicating it is not safe for passing in either direction.
These are double white line (dashed or solid) pavement markings on roadways that indicate where vehicles can or cannot cross to access the adjacent lane. When the double white lines are dashed, vehicles are allowed to cross over to the adjacent lane. When the double white lines are solid, lane changes are prohibited.
These are the solid white lines along the side of the pavement. They serve as safety guides, especially at night when it is difficult to see the edge of the road. A yellow edge line may be used on the left side to warn of narrow or raised medians.
These are the white dashes that mark the individual lanes of travel on streets and highways having more than one lane for traffic moving in the same direction.
When there are four or more lanes with traffic moving in opposite directions, two solid yellow lines mark the center of the roadway. You may cross these lines only to make a left turn into or from an alley, private road, driveway, or another street. When traveling on a multi-lane road, stay in the right lane except to pass other vehicles traveling in the same direction.
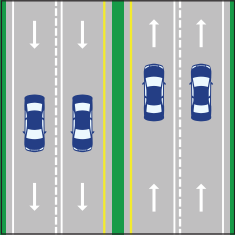
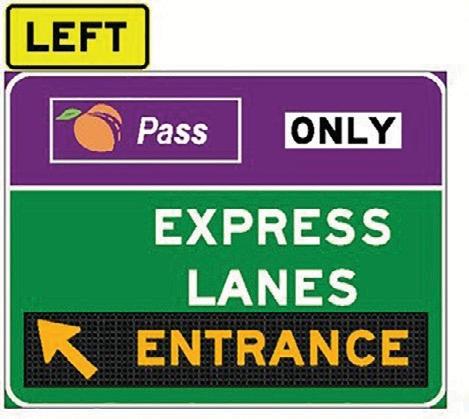
Express Lanes offer motorists the option to pay a toll to bypass congestion in certain areas on the interstate. All vehicles with no more than two axles or up to six wheels can use Express Lanes if they have a registered Peach Pass. When the vehicle travels through the Express Lane, the toll amount will automatically be deducted from the pre-established account. There are currently two sets of Express Lanes in Georgia.
The I-85 Express Lanes are HOT Lanes along I-85 North in Gwinnett County. They are open 24-hours per day. On the I-85 Express Lanes, registered transit, three or more person carpools, motorcycles, emergency vehicles, and Alternative Fuel Vehicles (AFV) with the proper AFV license plate are allowed to use the lanes toll-free.
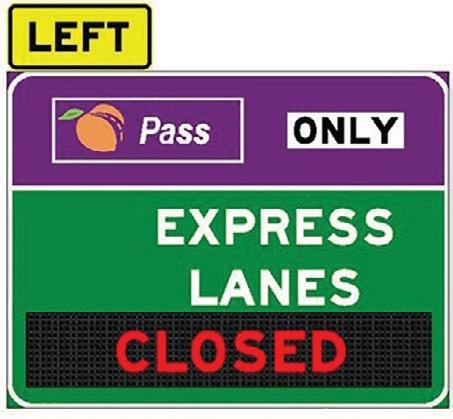
The I-75 South Metro Express Lanes are new, reversible lanes along 1-75 South in Henry and Clayton counties. Reversible lanes change directions during the day to provide additional travel options during peak travel periods. When the travel direction is being reversed, signs will show the lanes are closed. On the I-75 South Metro Express Lanes, all vehicles, including motorcycles and electric vehicles, are required to pay a toll. Public transit buses, registered vanpools and emergency response vehicles may use the lanes toll-free if they have a Peach Pass.
This lane, bordered by solid yellow and/or broken yellow lines, is in the center of streets and highways to make left turns. A motorist desiring to turn left should proceed to the turn lane just prior to making a left turn. Georgia law prohibits the use of this lane for any purpose other than making a left turn. You may enter this lane no more than 300 feet from the location of the left turn.
When a turning lane is provided for vehicles traveling in both directions, you should use extreme caution before entering the turning lane to make a left turn. There may be a vehicle traveling in the opposite direction also entering the turning lane to make a left turn. This is especially problematic in congested areas.
These are solid white lines typically located between the farthest right traffic lane and the curb or edge of the roadway. If there is a right-turn-only lane present, the bicycle lane will be located to the left of the right-turn-only lane in order to safely accommodate bicycles traveling straight through the intersection. Bicycle lanes may also be marked with painted symbols of a bicycle. Drivers of motor vehicles are prohibited from driving or parking in the bicycle lane, except to cross over it to make a turn. When crossing over a bicycle lane to make a turn, motorists must yield to bicyclists that are present.
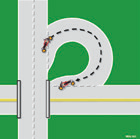
Roundabouts are sometimes used at intersections instead of stop signs. The purpose of a roundabout is to allow the intersection to handle heavier traffic flow without the need for a signal or a four-way stop. When entering a roundabout, traffic laws concerning right-of-way still apply. You must yield to other traffic that is already in the roundabout. You will always enter a roundabout to the right, and continue circling to the right until you have reached the roadway onto which you want to turn. When reaching the desired road, you will always turn right.
These markings, created by diagonal yellow lines, are on streets and highways indicating that the road is narrowing or there is an obstruction on the roadway. The area is similar to a triangle with solid yellow diagonal lines within the outside lines. Always keep to the right of these markings.
Riding a motorcycle demands your full attention. Responsible riders pay attention to the riding environment, identify potential hazards, look for escape routes and make good decisions.
Alcohol is a major contributor to motorcycle crashes, particularly fatal crashes. According to 2017 NHTSA statistics, 42% of motorcycle riders who died in single-vehicle crashes in 2015 were alcohol-impaired. Riding “under the influence” of alcohol or other drugs poses mental, physical and legal hazards for every rider.
By becoming knowledgeable about the effects of alcohol and other drugs, you will see that riding and alcohol/drugs don’t mix.
Alcohol and other drugs impair your:

Unlike other beverages, alcohol is absorbed directly through the walls of the stomach and the small intestine, goes into the bloodstream, and travels throughout the body and to the brain. Alcohol is absorbed quickly and can be measured within 30 to 70 minutes after a person has had a drink.
A typical drink equals about half an ounce of alcohol. This is the approximate amount of alcohol found in:
BAC refers to the amount of alcohol contained in a person’s blood. In all states, an adult with a BAC of 0.08% or above is considered intoxicated. However, impairment begins with the first drink. Even under .08, you can be impaired and convicted for riding impaired. How fast a person’s BAC rises varies with a number of factors:
The safest and most responsible choice is to not drink and ride, because once you start, your judgment is affected and your ability to say “no” gets weaker.
If you plan on drinking, leave your motorcycle at home and find other transportation so you won’t be tempted to ride impaired. Or, call ahead to where you plan on drinking and ask if there is a secure place for you to store your motorcycle overnight so you can find an alternative way home – such as a taxi or designated driver.
There are no shortcuts to sobering up fast. None of the “remedies” you may have heard about – cold showers, hot coffee, or physical exercise – will make you sober faster. The only proven remedy to sobering up is time. Remember – your body can process about one drink an hour.
All drugs may affect your ability to ride safely. This is true of many prescription, over-the-counter, and illegal drugs. If you are not sure if it is safe to take a drug and ride, ask your doctor or pharmacist about any side effects.
Never drink alcohol while you are taking other drugs. These drugs could multiply the effects of alcohol or have additional effects of their own. These effects not only reduce your ability to operate your motorcycle, but could cause serious health problems, even death.
There are many health conditions that can affect your riding, even little problems. Check with your doctor if a health condition could interfere with you operating a motorcycle.
Emotions can interfere with your ability to think, create mental distractions, increase risk-taking, create a lack of attention, and interrupt the ability to process information. You may not be able to give all your attention to operating a motorcycle if you are overly worried, excited, afraid, angry or depressed.
The law defines “open alcoholic beverage container” as any bottle, can, or other receptacle that contains any amount of alcoholic beverage and: (1) is open or has a broken seal; or (2) the contents of which are partially removed.
The law prohibits anyone from consuming any alcoholic beverage, or possessing any open alcoholic beverage container in the passenger area of any motor vehicle which is on the roadway or shoulder of any public highway. Only a person who consumes an alcoholic beverage or possesses an open alcoholic beverage container will be charged with an open container violation; however, a driver who is alone in a motor vehicle shall be deemed to be in possession of any open alcoholic beverage container. Anyone who violates this law is subject to a fine not to exceed $200.
This provision does not apply to any passenger in the passenger area of a motor vehicle designed, maintained, or used primarily for the transportation of persons for compensation or in the living quarters of a motor home or house trailer.
The court shall order a person convicted of impaired driving to have an ignition interlock device attached to his/her vehicle for second and subsequent offenses within five (5) years, unless the court exempts the person due to financial hardship. This is required for any vehicle that is operated by the offender for a period of twelve (12) months.
License plates are also seized anytime a violator is convicted of a second or subsequent DUI within five (5) years.
Minors: In addition to court-imposed penalties, drivers between the ages of 15-21 who are convicted of impaired driving must delay obtaining their graduated license for 12 months. The BAC level for DUI for persons under 21 has been established at .02, while the level for adults is .08.

A responsible rider makes a point to:
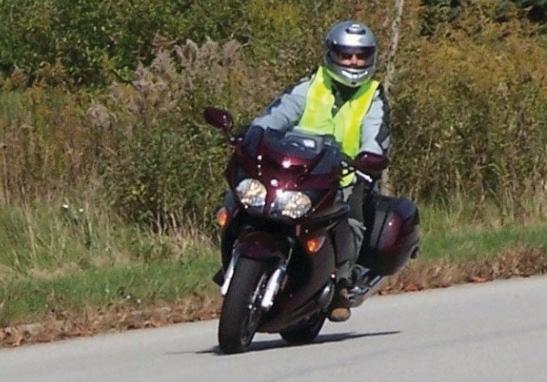
Anytime you ride a motorcycle you should wear:
Crash data shows that head injuries account for a majority of serious and fatal injuries to motorcyclists. Research also shows that riders wearing helmets have fewer and less severe head injuries in a crash.
Here are some facts to consider:
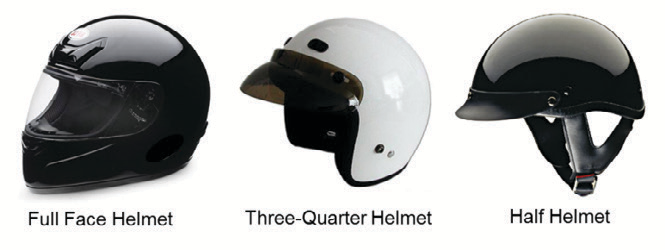
Protection should be the first consideration when buying your motorcycle helmet. There are three primary types of helmets: full face, three-quarter, and half. A full face helmet gives the most protection since it covers all of the head and face. This design has a flip-up face shield that protects the eyes. A three-quarter helmet affords riders good head protection and is constructed with the same basic components, but doesn’t offer the face and chin protection of full-face helmets. If you wear a three-quarter helmet, you should use an approved snap-on face shield or goggles. Half helmets provide the least amount of protection.
Whichever style you choose, make sure that the helmet:
A helmet should fit comfortably, but snugly. A helmet that is too loose can lift in the wind or come off your head in a fall. One that is too tight can create sore areas or cause headaches. When choosing a helmet, try on several brands and sizes to get an idea of fit and comfort.
Here are a few tips for the best fit:
Whatever helmet you decide on, keep it securely fastened on your head when you ride. Otherwise, if you are involved in a crash, it’s likely to come off your head before it gets a chance to protect you.
Eye protection is required in Georgia. Without face protection, an object could hit you in the eye, face, or mouth. A full face helmet provides the maximum face and eye protection while riding and in the event of a crash. A plastic shatter-resistant face shield can help protect your eyes and face from wind, dust, dirt, rain, insects, and pebbles thrown up from cars ahead. These distractions can be painful and can take your full attention from the road. Whatever happens, keep your eyes on the road and your hands on the handlebars.
Face shields come in a variety of designs to fit most any helmet. Make sure that the face shield you choose is designed for your helmet and does not interfere with eyeglasses or sunglasses.
To be effective, eye or face shield protection must:
Windshields will not protect your eyes from the wind and debris; neither will eyeglasses or sunglasses. A windshield is not a substitute for a face shield. Glasses will not keep your eyes from watering, and they might blow off when you turn your head while riding. Goggles protect your eyes, though they won’t protect the rest of your face like a face shield does. Goggles can also reduce peripheral vision. Tinted eye protection or shields should not be worn at night or any other time when little light is available.
Long-term exposure to wind noise can cause irreversible hearing damage. Properly worn hearing protection can reduce wind noise and make your ride more enjoyable, while still allowing you to hear important sounds like car horns and sirens. You can choose from a variety of styles, from disposable foam plugs to reusable custom-molded devices.
Riding gear designed for motorcycle riders provides protection in the event of a crash, as well as from heat, cold, rain, debris, and hot or moving parts of the motorcycle. Sturdy synthetic or leather materials provide the best protection. Wearing brightly colored clothing with reflective material will make you more visible to other roadway users.
Whatever the weather conditions, always wear protective gear that will keep you comfortable, enabling you to concentrate on your riding.
You should get to know your motorcycle. Learning how things work and what parts need the most attention could reduce your chances of being in a crash and extend the life of your motorcycle. To make sure that your motorcycle will not let you down:

It is important to read your motorcycle owner’s manual to learn where your motorcycle controls are and how to operate them. You should be able to operate them while riding without having to look for them.
The following section offers basic riding information on getting started, shifting gears, stopping, straight-line riding and turning. These basic skills are important to learn before moving onto more complex skills.
(TCLOCS is a Service Mark of MSF)
(Coolant, hydraulic fluid, fuel)
To mount the motorcycle, stand on the left side of the motorcycle. Keep your eyes up toward the horizon. Grasp both handgrips, squeeze the front brake to keep the motorcycle from rolling, and swing your right leg over the seat. Sit and straighten the bike; raise the side stand with your foot.
To properly control a motorcycle:
Since most motorcycles have a manual transmission, you will need to use the “friction zone” to start the motorcycle moving and to prevent stalling. The friction zone is the point on the clutch where the engine’s power begins to transmit to the rear wheel. As you reach the friction zone, roll on the throttle and the motorcycle will start moving forward. Do not fully release the clutch lever until your motorcycle is moving and stable.
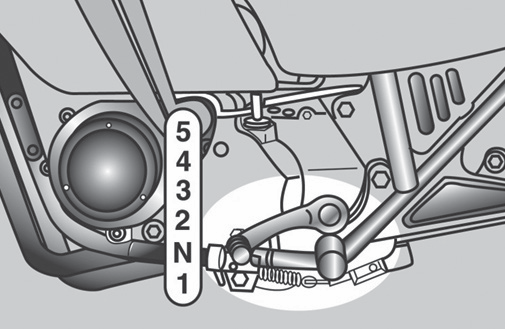
There is more to shifting gears than simply getting the motorcycle to pick up speed smoothly. Learning to use the gears when downshifting, turning, or starting on hills is important for safe motorcycle operation.
Here are some important tips to remember when starting on a hill:
It is more difficult to start the motorcycle moving on an upgrade than on flat ground. There is always the danger of rolling backwards into a vehicle behind you.
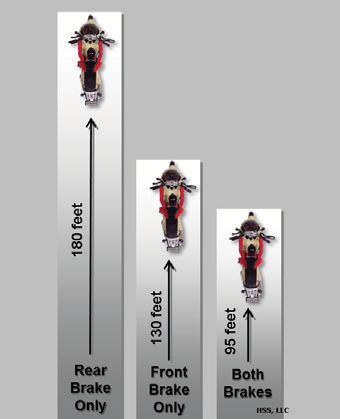
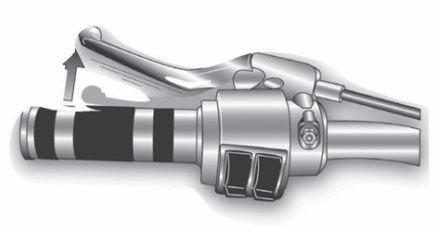
Your motorcycle has brakes on the front and rear wheels. Always use both brakes, every time you slow or stop. The front brake can provide 70% or more of your total stopping power, therefore, use of the front brake is required for effective speed reduction. Using both front and rear brakes shortens stopping distance.
To stop your motorcycle, squeeze the front brake and press down on the rear brake gradually until stopped. Grabbing at the front brake or jamming down on the rear can cause the brakes to lock, resulting in control problems.
If you need to stop while leaned over in a curve, apply smooth gradual pressure to both brakes as you start reducing your lean angle. The more you reduce the lean, the more traction you will have to stop. You can apply more brake pressure as your motorcycle straightens up.
New riders must be aware of the difficulty of negotiating turns and curves. Riders often try to take curves or turns too fast. Reduce speed before entering the turn and maintain this speed. These four steps will help you learn the skills for turning:
In normal turns, the rider and the motorcycle should lean together at the same angle.
In slow tight turns, counterbalance by leaning the motorcycle only and keeping your body straight.
Safe riding is more of a skill of the eyes and mind than of the hands and feet. You need to develop a set of street riding strategies that allows you to gather critical information to make good decisions and avoid problems.
Almost all activities people engage in have some level of risk. Operating a motorcycle requires your constant and full attention to reduce risk. Consider the following steps to manage risk and be a responsible rider:
Accept the responsibilities associated with operating a motorcycle:
Riding a motorcycle involves some risks not encountered when driving other types of vehicles. Some of these risks include:
Once you become aware of the risks associated with motorcycling, it is time to accept those risks. Choosing to accept the challenges of being a responsible motorcyclist means to think about the consequences of your riding behavior in traffic. It also means accepting personal responsibility for the results of your decisions and actions, as well as developing good skills and judgment.

To manage risk, you must be aware of the potential risks and then have a plan to reduce the risks.
SM – SEE is a Service Mark of MSF. Used with permission.
SEE is a powerful, but simple, strategy - Search, Evaluate, Execute. It is the strategy to help you understand what is going on in traffic and to be constantly planning and implementing a course of action. Let’s examine each of these steps.
Searching aggressively as far ahead as possible, to the sides and behind to identify potential hazards and escape routes, may help to avoid a crash. When searching ahead, you should search for:
While it’s most important to keep track of what’s happening ahead, you can’t afford to ignore situations behind. Knowing what’s going on behind will help you make a safe decision about how to handle trouble ahead. To search behind:
Don’t forget to check the instruments and gauges regularly, too.
Once you have identified the hazard(s), the next step is to quickly determine if they could affect you. Ask yourself, “what if?”
Think about how hazards can interact to create risk for you. Anticipate potential problems and have a plan to reduce or eliminate the risk. Think about your time and space requirements in order to maintain a margin of safety. You must leave yourself time and space to react if a dangerous situation occurs.
Carry out your decision. What are you going to do and how are you going to do it?
To create more space and minimize harm from any hazard:
Apply the SEE strategy to give yourself time and space. It works anywhere and can help to minimize your risk and the risk of others.
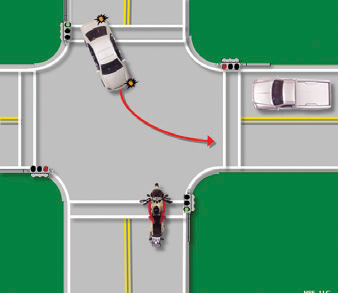
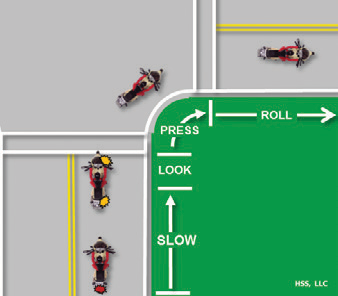
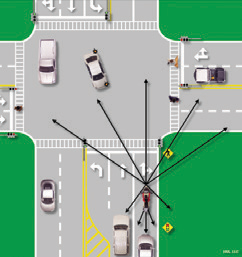
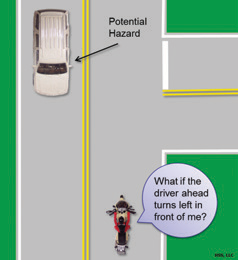
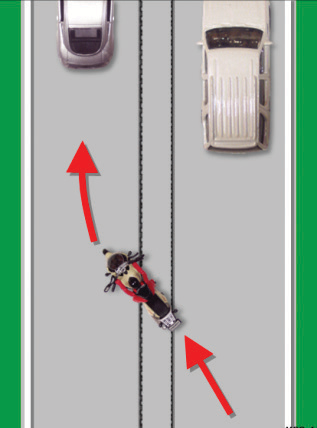
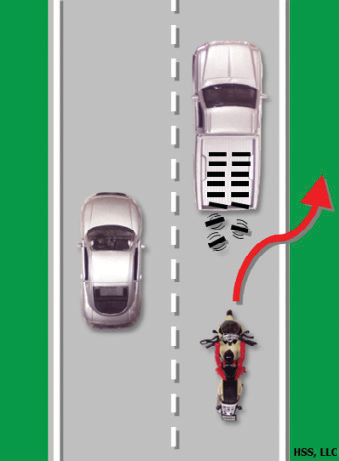
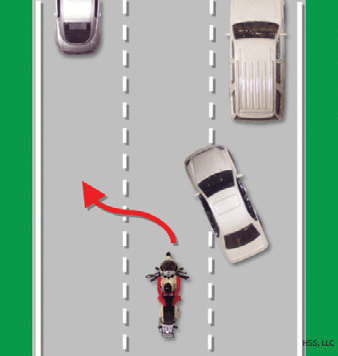
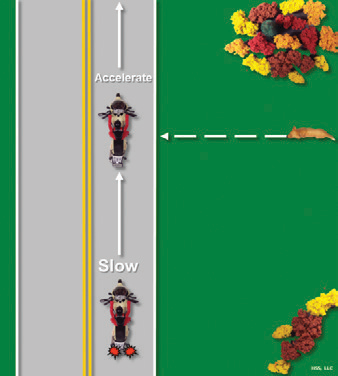
The greatest potential for conflict between you and other traffic is at intersections. Cars that turn left in front of you are the biggest dangers. Your use of SEE at intersections is critical.
Increase your chances of being seen at intersections. Ride with your headlight on in a lane position that provides the best view of oncoming traffic. Provide a space cushion around the motorcycle that permits you to take evasive action.
When approaching an intersection where a vehicle is preparing to cross your path:
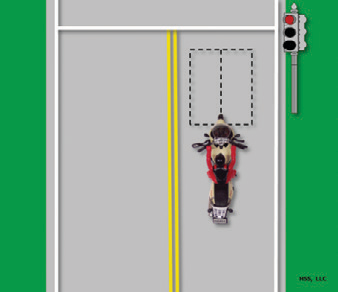
Traffic-activated sensor lights can be troublesome for motorcyclists since the sensor may not detect your presence.
To ensure the best chance of being detected, stop where the sensors are located. They are usually visible in the road surface.
It is extremely important to maintain an adequate “cushion of space” between vehicles.
Increasing the distance between vehicles will provide you with:
A responsible rider recognizes that time and space is the best protection against potential hazards.
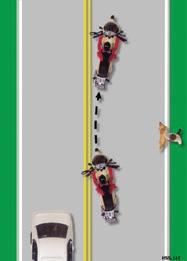
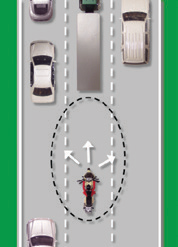
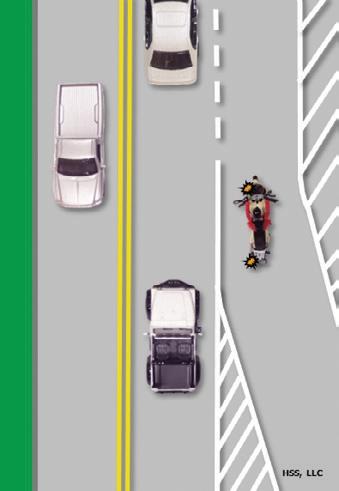
In some ways the size of the motorcycle can work to your advantage. Each traffic lane gives a motorcycle three paths of travel, as indicated in the illustration.
Your lane position should:
In general, there is no single best position for you to be seen and to maintain a space cushion around the motorcycle. No portion of the lane need be avoided – including the center, if weather and roadway conditions permit.
Position yourself in the portion of the lane where you are most likely to be seen and you can maintain a space cushion around you. Move from one side of the lane to another to increase your distance from other vehicles. A responsible rider changes position as traffic situations change. Ride in path 2 or 3 if vehicles or other potential hazards are on your left. Remain in path 1 or 2 if hazards are on your right. If vehicles are present on both sides of you, the center of the lane, path 2, is usually your best option.
The oily strip in the center portion that collects drippings from cars is usually no more than 2 feet wide. Unless the road is wet, the average center strip permits adequate traction to ride on safely. You can operate to the left or right of the oily strip and still be within the center portion of the traffic lane. Avoid riding on big buildups of oil and grease usually found at busy intersections or toll booths.
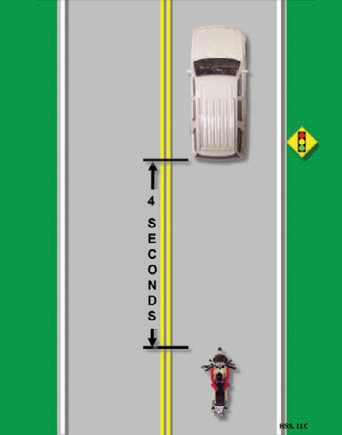
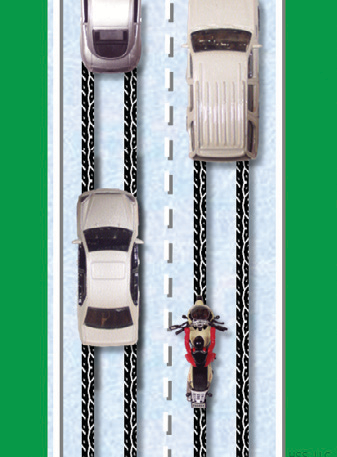
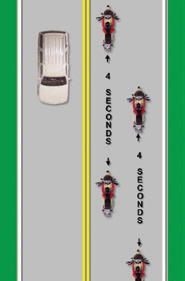
Motorcycles need as much distance to stop as cars. It is recommended that new motorcycle operators try to maintain a minimum four-second following distance behind the vehicle ahead. This allows you space to stop, swerve, and keep a reasonable space cushion.
A larger cushion of space is needed if your motorcycle will take longer than normal to stop. For example, if you are riding 40 mph or more, if the pavement is slippery, if you cannot see through the vehicle ahead, or if traffic is heavy and someone may squeeze in front of you, open up a five second or more following distance.
Keep well behind the vehicle ahead even when you are stopped. This will make it easier to get out of the way if someone behind you is not slowing down. It will also give you a cushion of space if the vehicle ahead starts to back up for some reason.
To gauge your following distance:
Speeding up to lose someone following too closely only ends up with someone tailgating you at a higher speed.
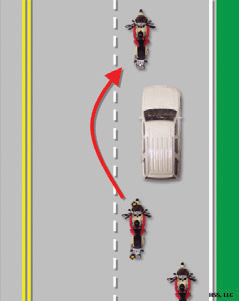
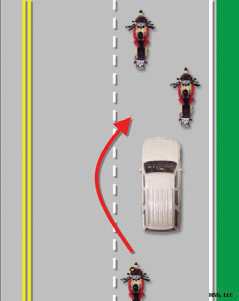
A better way to handle tailgaters is to get them in front of you. When someone is following too closely, change lanes and let them pass. If you can’t do this, slow down and open up extra space ahead of you to allow room for both you and the tailgater to stop. This will also encourage them to pass. If they don’t pass, you will have given yourself and the tailgater more time and space to react in case an emergency does develop ahead.
Vehicles and motorcycles need a full lane to operate safely. Do not share lanes with other vehicles. Lane sharing can leave you vulnerable to the unexpected and reduces your space cushion. You should ride in a staggered formation when following other motorcycles. Position the motorcycle in the center of the travel lane, if weather and roadway conditions permit, to discourage motorists from attempting to squeeze by the motorcycle. Do not ride between rows of stopped or moving motor vehicles. This can be dangerous.


Do not assume that drivers merging on an entrance ramp will see you. Minimize the potential for danger by giving them plenty of room. Change lanes if one is open. If there is no room for a lane change, adjust speed to open up space for the merging driver.
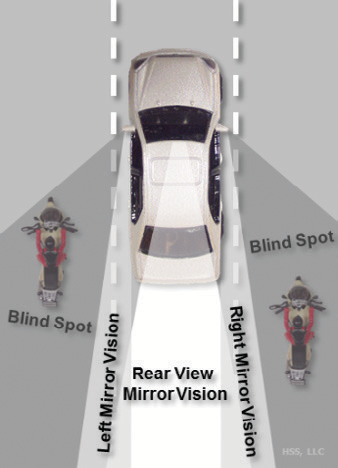
Avoid riding in the blind spot of a vehicle. Responsible riders recognize that vehicles traveling in the adjacent lane may unexpectedly change direction forcing the rider into a potentially dangerous situation. Vehicles in the next lane also block your escape if you come upon a hazard in your own lane. Adjust your speed until a proper and adequate space cushion has been established between vehicles.
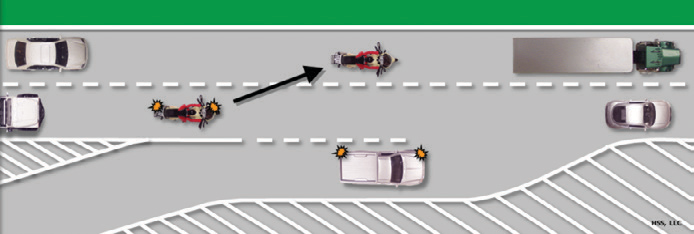
An escape route is an alternate path of travel that you can take if a hazard develops in your path. No matter what the conditions, always use SEE and plan an escape route. In the illustration on the top of the next page, the first box shows a rider who has three escape routes open, if an alternate path is needed. The second box shows a rider who has not planned an escape path. The rider has nowhere to go if an alternate path of travel is needed, which leaves the rider vulnerable to potential hazards.

In crashes with motorcyclists, drivers often say that they never saw the motorcycle. From ahead or behind, a motorcycle’s outline is much smaller than a car’s. Also, it’s hard to see something you are not looking for, and most drivers are not looking for motorcycles. More likely, they are looking through the narrow, two-wheeled silhouette in search of cars that may pose a problem to them.
Even if a driver does see you coming, you aren’t necessarily safe. Motorcycles may appear farther away, and seem to be traveling slower than they actually are. It is common for drivers to pull out in front of motorcyclists, thinking they have plenty of time. Too often, they are wrong. However, you can do many things to make it easier for others to recognize you and your cycle.
Most crashes occur in broad daylight. Wear bright colored clothing to increase your chances of being seen. Remember, your body is half of the visible surface area of the rider-motorcycle unit.
Reflective, bright colored clothing is best. Bright orange, red, yellow or green jackets or vests are your best bets for being seen. Brightly colored helmets can also help others see you. Reflective material on a vest and on the sides of the helmet will help drivers coming from the side spot you. Reflective material can also be a big help for drivers coming toward you or from behind.
The best way to help others see your motorcycle is to keep the headlight on – at all times.
(NOTE: New motorcycles sold in the USA since 1978 automatically have the headlights on when running.) Studies show that, during the day, a motorcycle with its light on is twice as likely to be noticed. Also, use your low beams in fog or at night when traffic approaches.
The signals on a motorcycle are the same as those on a car. They tell others what you plan to do. Use them anytime you plan to change lanes or turn. Use them even when you think no one else is around. Due to a rider’s added vulnerability, signals are even more important. They make you easier to spot.
When you enter a freeway, drivers approaching from behind are more likely to see your signal blinking and make room for you.
Once you turn, make sure your signal is off or a driver may pull directly into your path, thinking you plan to turn again.
Your motorcycle’s brake light is usually not as noticeable as the brake lights on a car – particularly when your taillight is on. (The taillight goes on with the headlight.) If the situation will permit, help others notice you by flashing your brake light before you slow down.
It is especially important to flash your brake light before:
If you are being followed closely, it’s a good idea to flash your brake light before you slow down. The tailgater may be watching you and not see something ahead that will make you slow down. This will hopefully discourage them from tailgating and warn them of hazards ahead they may not see.
Be ready to use your horn to get someone’s attention quickly. Keep in mind that a motorcycle’s horn isn’t as loud as a car’s, therefore, use it, but don’t rely on it. Other strategies may be appropriate along with the horn.
On slippery surfaces, you should use added caution. Motorcycles handle better when ridden on surfaces with good traction. Maintaining balance and cycle control are difficult on slippery surfaces.
To reduce your risk, you can take certain preventative measures:
Surfaces that provide poor traction include:
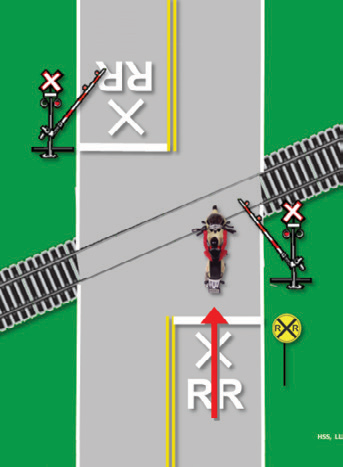
Usually, it is safer to ride straight within your lane to cross tracks. Turning to take tracks at a 90 degree angle can be more dangerous – your path may carry you into another lane of traffic.
For track and road seams that run parallel to your course, move far enough away from tracks, ruts, or pavement seams to cross at an angle of at least 45. Then, make a quick, sharp turn. Edging across could catch your tires and throw you off balance.


Riding over rain grooves or bridge gratings may cause your motorcycle to weave. Maintain a steady speed and ride straight across. Crossing at an angle forces riders to zigzag to stay in the lane.

On the road, situations change constantly. As a responsible rider, you know how important it is to be in full control of the motorcycle. A responsible rider knows that good road management starts with knowledge and practice of SEE.
No matter how careful you are, there will be times when you find yourself in a difficult spot. Your chances of avoiding a crash and possible injury will depend on your ability to react quickly and properly. Two critical crash avoidance skills you will need to learn and practice are stopping quickly and swerving.
Stopping a motorcycle quickly and safely is a skill that requires a lot of practice.
This is accomplished by applying controlled pressure to both the front and rear brakes at the same time without locking either wheel.
To do this:
If you must stop quickly while turning or riding in a curve, the best technique is to straighten the motorcycle, square the handlebars and then stop. There may be conditions that do not allow straightening first, such as running off the road in a left-hand curve or dealing with oncoming traffic in a right-hand curve. In such situations, apply the brakes smoothly and gradually. As you slow, reduce your lean angle and apply more brake pressure until the motorcycle is straight and maximum brake pressure is possible. You should “straighten” the handlebars in the last few feet of stopping; the motorcycle should then be straight up.
Some motorcycles use this technology to prevent wheel lock-up. If your motorcycle is equipped with anti-lock brakes apply maximum pressure on both the front and rear brakes as quickly and firmly as you can. You may feel a pulsation in the brakes; continue to hold brake pressure until you have completely stopped. Most ABS systems are designed to reduce or prevent wheel lock-up only while riding in a straight line; ABS may not prevent wheel lockup while leaned over in a curve or turn.
Sometimes a skid cannot be avoided. Here’s what to do:
Swerving to avoid a crash may be appropriate if stopping is not an option. A swerve is any sudden change in direction. Be sure you have enough time and space to swerve. It can be two quick turns or a rapid shift to the side. To swerve:
If braking is required, separate it from swerving. Brake before or after – never while swerving.
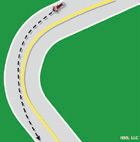
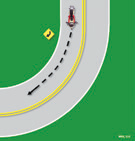
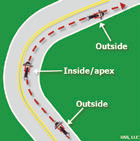
Many crash-involved riders enter turns too fast and are unable to complete the curve. The basic turning procedure – slow, look, press, roll – applies to all curves. Every curve is different. Be alert to whether a curve remains constant, gradually widens, gets tighter or involves multiple turns. Ride within your skill level and posted speed limits.
You should move to a position based on road condition and traffic before entering a curve and adjust as necessary. This permits you to spot approaching traffic as soon as possible. You can also adjust for traffic “crowding” the center line or debris blocking part of your lane.
Your best path may not always follow the curve of the road. Change lane position depending on traffic, road conditions and curve of the road.
Commercial motor vehicles are vital to the economy of Georgia and the United States. Most of the products used in everyday life were delivered to stores by commercial motor vehicles. Drivers of commercial motor vehicles are trained, specially licensed driving professionals. Sharing the road with commercial motor vehicles is a necessary part of travel. Heavy trucks typically weigh 80,000 pounds or more, and riders should use caution when near them.
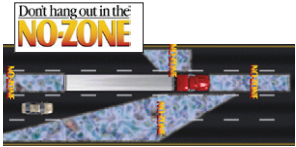
Typically, the larger the vehicle, the larger the blind spots. A commercial motor vehicle’s blind spots are dangerous because truck drivers can’t see vehicles in these areas.
It is impossible to completely avoid a truck’s blind spots. However, car drivers and motorcyclists should not remain in the “No Zone” any longer than needed to safely pass a heavy truck.
The easiest way to avoid lingering in the “No Zone” is to look for the truck driver’s reflection in the side mirror. If you cannot see the driver’s reflection, you are in the truck driver’s blind spot.
As depicted in this illustration, these areas around the truck include: directly in front, directly behind, and along each side of the vehicle - especially on the right side.
In this illustration the commercial motor vehicle’s blind spots, or “No Zones”, are highlighted in blue. These are areas to avoid whenever possible.
Motorcycles are permitted to use HOV lanes regardless of the number of persons riding on the motorcycle. Motorcycles may also use the HOT lanes at no cost by obtaining a toll-exempt PeachPass account. Contact the State Road and Tollway Authority at 1-855-PCHPASS (724-7277). However, motorcycles must pay regular tolls on designated toll roads.

A PeachPass electronic toll transponder may be obtained to more easily pay for transit on designated toll roads; a PeachPass is required when using HOT lanes. To obtain more information about a Georgia PeachPass for all types of vehicles including motorcycles, go to: http://www.peachpass.com.
Law Enforcement will stop people who drive unsafely around commercial motor vehicles, whether the person is driving a car, motorcycle or commercial motor vehicle.
What to do to avoid getting a citation:
The following section offers some additional information on special riding situations you may encounter when riding a motorcycle.

A road surface that is higher in the middle than at the sides is a crowned road. Use caution when going around curves to the left because ground clearance is reduced and the lean angle available will be less than on a flat road.
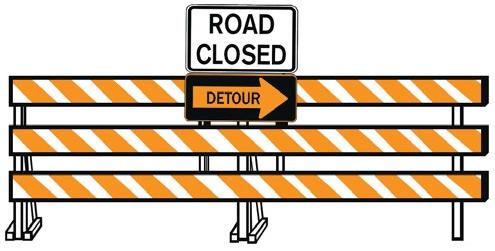
Work zones present a hazard to all drivers but even more so for motorcycle riders. Lacking four-wheel stability, the motorcycle rider must reduce speed and be especially mindful of potential hazards.
The following are types of work zone road hazards and what to do if you encounter them:
You will seldom hear a tire go flat. If the motorcycle starts handling differently, it may be a tire failure. This can be dangerous. You must be able to tell from the way the motorcycle reacts. If one of your tires suddenly loses air, react quickly to keep your balance. Pull off and check the tires.
If the front tire goes flat, the steering will feel “heavy.” A front-wheel flat is particularly hazardous because it affects your steering. You have to steer well to keep your balance.
If the rear tire goes flat, the back of the motorcycle may jerk or sway from side to side.
If either tire goes flat while riding:
Dogs sometimes chase motorcycles. Once an approaching dog is spotted, slow down and downshift until the dog is near your motorcycle, then accelerate crisply away from the dog as it approaches. Keep control of your motorcycle, and look to where you want to go. Don’t kick at the dog because it will make controlling the motorcycle difficult.
Larger animals such as deer or elk present a different problem. These animals are unpredictable, and hitting one can be as harmful as colliding with another vehicle. Use more aggressive SEE maneuvers for additional time and space in areas where larger animals may be present. If one of these animals is encountered on or near the roadway, the only reliable action is to stop before reaching it. Then wait until the animal leaves or move past the animal at walking speed.
Strong, steady winds can affect you and your motorcycle. The effects can occur anywhere and often happen in open areas or mountainous terrain.
Wind turbulence can occur when you share the road with large vehicles like trucks, buses and recreational vehicles.
To respond to wind gusts or windblasts:
Only skilled, experienced riders should carry passengers or heavy loads or ride in groups. If you choose to carry passengers or heavy loads or ride in a group you will need to know some important information.
Before carrying a passenger or heavy loads, know how both could affect motorcycle operation. The extra weight of a passenger or cargo will affect the way your motorcycle handles, requiring extra practice, preparation and caution. For this reason, only experienced riders should attempt to carry passengers or large loads. Before taking a passenger or heavy load on the street, check the air pressure of both tires and adjust the suspension settings to compensate for the lower rear of the motorcycle. Refer to the owner’s manual for more information.
When carrying a passenger, your motorcycle should have:
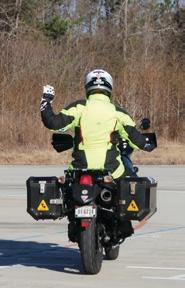
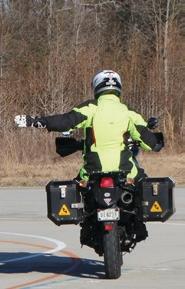
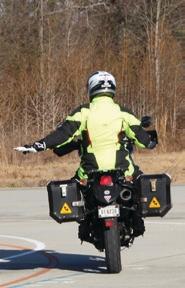
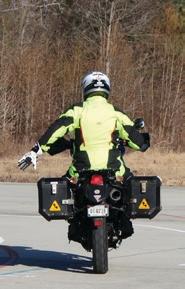
When riding with passengers:
Your passenger should wear the same protective gear as you. As a routine practice, instruct your passenger on cycling basics prior to starting the trip. Even if your passenger is a motorcycle rider, provide complete instructions before you start.
Tell your passenger to:
Also, tell your passenger to tighten his or her hold when you:
Riding with others is one of the many great experiences of motorcycling. Responsible riders do so in a manner that neither endangers nor interferes with the free flow of traffic. Riding with other cyclists may help to increase rider visibility and safety. Concentration and communication are essential to group riding. You should gain some riding experience before riding in a group. To enhance safety and reduce the risk of injury when riding in groups, you should:
Riding a motorcycle requires a great amount of mental alertness and physical skill. Sometimes changes in your environment occur, which can affect your visibility. Physical changes may occur as well, which may affect your riding performance. Responsible riders know how to adjust or compensate for factors which affect rider performance.
In cold weather riding, protect yourself by wearing proper protective gear like a windproof jacket and insulated layers of clothing. It is wise to dress in layers so the layers can be removed as desired. Topping the protective gear with a windproof outer layer can prevent cold air from reaching the skin.
Cold weather significantly lengthens your reaction time. To compensate for the slower reaction time, reduce your speed and increase your following distance and space to the sides.
Riding for long periods in cold weather may lower your body temperature and cause hypothermia. Symptoms of hypothermia may include:
If chill is experienced, leave the roadway at your first opportunity and find shelter. Drink warm liquids, do some exercise to warm yourself, and if your clothes are wet, change out of them.
In extreme hot weather, wear protective gear that breathes. It is still important to wear a jacket and pants to protect you in a collision and to prevent dehydration. Drink plenty of water, stop and remove unnecessary, heavy clothing and dry your hands if they become slippery due to perspiration.
Riding at night presents additional risks because a rider’s ability to see and be seen by others is limited. You should adjust your riding behavior to compensate for limited visibility by:
A distraction is anything that takes your attention away from riding. Rider distractions may occur anytime and anywhere. Distracted riding can cause collisions, resulting in injury, death or property damage. Taking your eyes off the road or hands off the motorcycle presents obvious riding risks. Mental activities that take your mind away from riding are just as dangerous. You must constantly maintain your full attention to the riding task. You are completely and solely responsible for operating your motorcycle in a safe manner.
Fatigue can affect your control of the motorcycle. To minimize the potential for fatigue:
Traditional two-wheel motorcycles are considered single-track vehicles. Three-wheel vehicles could have either double or triple tracks. Double track vehicles are motorcycles with sidecars, while triple track vehicles (trikes) can have either two front wheels or two rear wheels.
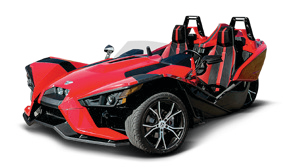
The Georgia General Assembly changed the definition of a Class C motor vehicle in O.C.G.A. § 40-5-23(c) to include three-wheel motor vehicles equipped with a steering wheel. They also changed O.C.G.A. § 40-6-311(b) to distinguish motorcycles as motor vehicles controlled by handlebars requiring the operator to straddle the seat.
A three-wheel vehicle is naturally more stable than a two-wheel motorcycle. However, under certain conditions it could “tip over” or lift one of the wheels off the pavement. In order to ensure its stability, you will need to pay attention to your body position, your speed, and how you load a three-wheel vehicle.
They also steer differently. Since three-wheel vehicles cannot lean, the front wheel needs to be pointed in the direction you want the vehicle to go.
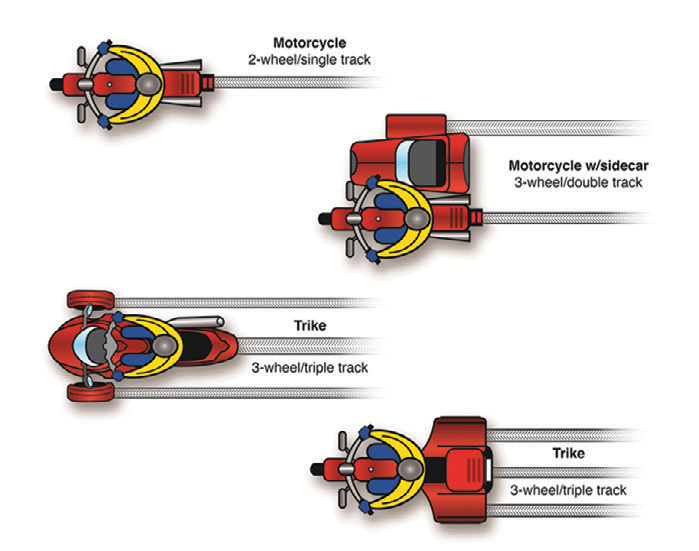
Make sure you are completely familiar with the three-wheel vehicle before you take it out on the street. Be sure to review the owner’s manual. Remember, three-wheel vehicles take up more space than two-wheel motorcycles and therefore you will need more space to maneuver.
Your body position is important for control on a three-wheel vehicle. You should be able to reach both handgrips comfortably while leaning and shifting your weight in turns.
Approach turns and curves with caution. If you enter a turn too fast you may end up crossing into another lane of traffic, lifting a wheel, or going off the road. Oversteering could cause the vehicle to skid and you could lose control.
When riding uphill on a three-wheel vehicle, some weight will shift to the rear, causing the front of the vehicle to become lighter. This weight shift reduces the traction on the front wheel(s) for steering and braking. You should shift some of your body weight forward to maintain steering control.
When riding downhill, gravity increases the amount of braking force required to slow or stop the vehicle. It is important, therefore, to begin slowing earlier for cornering and stopping.
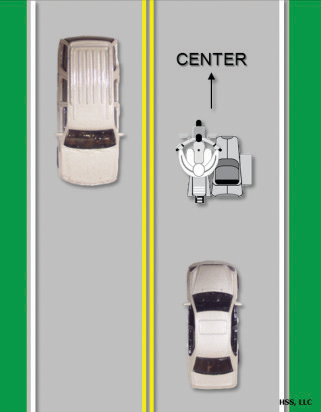
The width of a three-wheel vehicle is similar to the width of some automobiles, therefore, unlike a two-wheel motorcycle, you are limited in lane positioning. Keep toward the center of the lane and within the lane markings.
Lane positioning when riding in groups is also an important consideration. Ride single file and always maintain a safe margin, four seconds minimum, between vehicles.
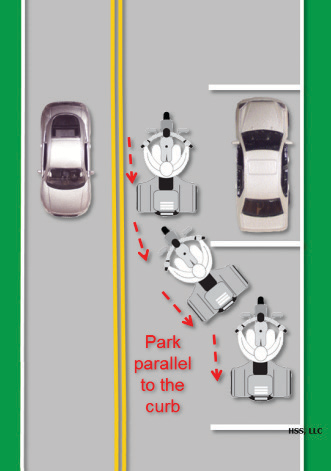
Position your vehicle in a parking space so you are parked parallel to the curb. Set the parking brake or leave it in gear to keep it from rolling. Parking parallel to the curb will facilitate pulling away from the curb and entering the lanes of traffic.
A three-wheel vehicle is not as maneuverable as a two-wheel motorcycle, so it is important to look well ahead to avoid the need for any sudden turns or swerving. Swerving is seldom the best option to avoid a collision on a 3-wheel vehicle. If swerving is required, brake either before or after the swerve, never while swerving. You should not attempt swerving without proper training. If you need to avoid a collision, the best option may be hard braking.
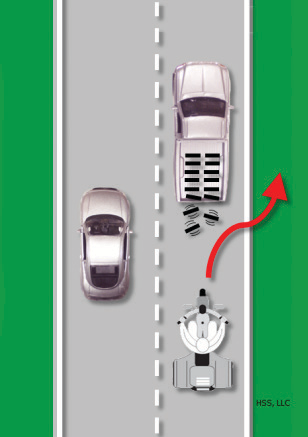

When riding through curves, remember to stay within your lane.
Adjust your speed before entering a curve. You may need to lean or shift your weight in the direction of the turn to avoid causing any of the wheels to leave the ground and, possibly, losing control.
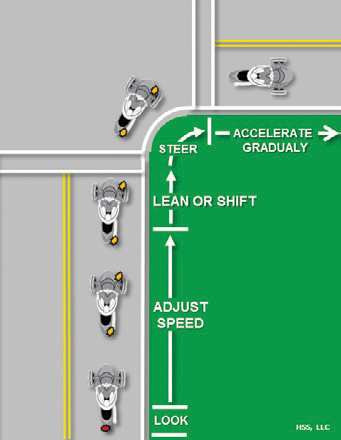
Because the weight of a trike is distributed almost equally between the two front or two rear wheels, these vehicles handle the same in left and right turns. When turning a trike:
An important handling characteristic to be aware of on a standard trike (1 wheel up front, 2 in the rear) is that the two rear wheels have more braking power. How much varies by trike design. This is because weight does not shift to the front wheel on a trike during hard braking. Most of the weight stays on the rear wheels and makes the rear brakes more effective.
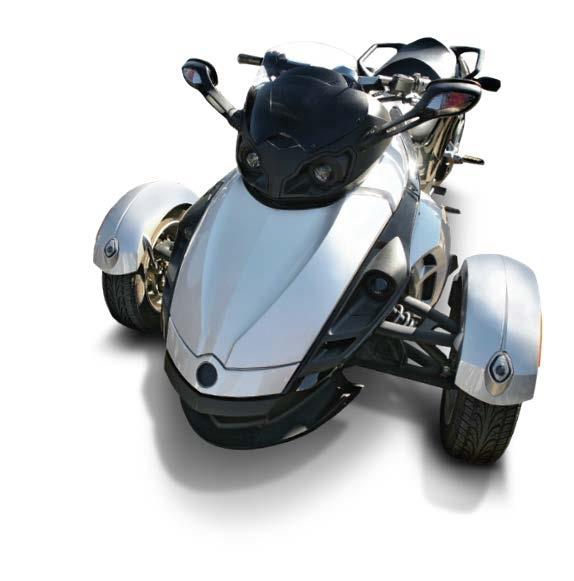
Only skilled, experienced riders should carry passengers or heavy loads. The additional weight of a passenger or cargo will change the handling characteristics of the vehicle.
If a passenger is being carried, the passenger will sit directly behind you. When carrying cargo, center the load and keep it low in the storage areas so it is balanced side-to-side. Refer to your owner’s manual for more information.
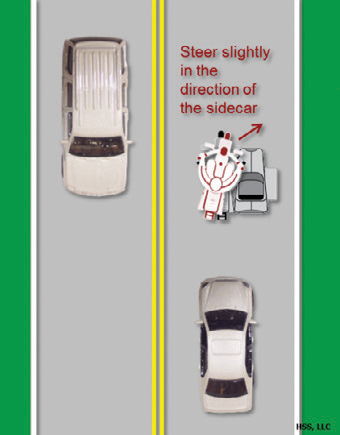
Check your sidecar for brakes. Some sidecars are equipped with brakes while others are not. Your stopping distance and handling will be affected if your sidecar is not equipped with brakes.
You may need to steer slightly in the direction of the sidecar when applying the motorcycle brakes if your sidecar is not equipped with brakes.

During acceleration, steer slightly in the opposite direction from the sidecar to maintain a straight line path.
When operating a sidecar-equipped motorcycle, additional consideration needs to be given to the direction of the turn and amount of weight in the sidecar. When turning a motorcycle with a sidecar:
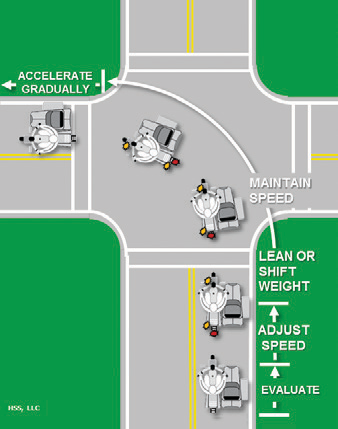
During a left turn, the sidecar acts as a stabilizer, so the sidecar wheel stays on the ground. However, if the turn is taken too sharply or at too great a speed, it may cause the rear wheel of the motorcycle to lift off the ground and the nose of the sidecar to contact the pavement.
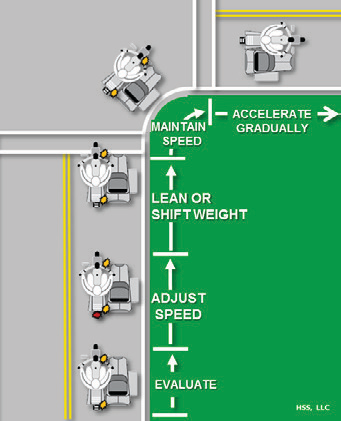
A right turn taken too sharp or at too great a speed may cause the sidecar wheel to lift off the ground. The lift will be greater if the sidecar is empty or lightly loaded. You can avoid this wheel lift by slowing before entering the turn and shifting more of your weight to the inside of the turn, towards the sidecar.
Stopping quickly in a straight line is the primary technique for avoiding collisions in traffic. Always, use the front and rear brakes simultaneously, adjusting pressure on the levers to apply maximum braking just short of skidding either wheel. If the front wheel skids, ease off some of the pressure to regain steering control. If the rear wheel skids, keep it locked until the vehicle has stopped completely. If the sidecar wheel has a brake, and that wheel starts to skid, you can safely ignore it.
Making quick stops in a curve is more difficult, especially if the road curves to the right. Hard braking in a curve to the right tends to lift the sidecar, which may require additional weight shift to the right to compensate. Stopping quickly in turns to the left is less dangerous because there is a reduced danger of tipping over. And, if the wheels skid, the vehicle will slide toward the road shoulder, not into the opposing lane of traffic.
Only skilled, experienced riders should carry passengers or heavy loads. The additional weight of a passenger or cargo will change the handling characteristics of the vehicle.
You must give some thought to where the passengers are seated and the loads are positioned. The best place for a passenger is in the sidecar. Avoid carrying a passenger behind you while leaving the sidecar empty. This could increase your chances for a tip over. If you have two passengers, place the heavier passenger in the sidecar to improve handling. The passenger sitting behind you should sit upright at all times. It is not necessary for the passenger to lean into curves with you. When loaded, your vehicle will need more time and distance to stop. You will need to increase your following distance.
When carrying cargo in a sidecar, it should be centered low, over the sidecar axle and secured firmly in place. If the cargo shifts, handling will be affected.
Beware of fake DMV websites that charge for training materials or informational material. Most customers arrive at these sites by doing a browser search for "Georgia DMV," "Georgia License Renewal" or similar generic searches.
Please read the pages of these sites carefully, because by law they are required to inform users that the site is not affiliated with any State or Government Entity. They are privately owned sites that will have .com or .org at the end of their website address (url). The official state of Georgia websites will have .gov as is the case with www.dds.georgia.gov.